Podcast editing is where raw conversation becomes something worth listening to. Done well, it’s invisible. Done poorly, it’s all your listeners notice.
This guide walks through the complete podcast editing workflow Podigy uses for every episode we produce. Not theory — actual steps, in order, with the reasoning behind each decision. After editing 1,000+ episodes for clients across B2B, education, and media, the workflow below is what we’ve converged on.
Who this is for: Podcast editors who want to move faster without sacrificing quality. Reaper users who want to go beyond basic cutting to professional processing chains. Podcasters considering handling their own post-production.
What this covers: The full post-production stack — from file organization and DAW setup through noise reduction, EQ, compression, mixing, and rendering. Reaper-specific automation that eliminates repetitive steps.
What this doesn’t cover: Recording setup, microphone choice, or acoustic treatment. Those affect your edit heavily, but they’re covered in our Reaper setup guide.
A note on scope: This is a Reaper-specific editing guide built around free plugins. We’re not adding new tools to this guide — if you’re still deciding which DAW to use, see our podcast recording and editing software comparison first. Everything here is a free resource for the podcast community based on what we’ve learned producing 1,000+ episodes.
In This Guide
- What Is Podcast Editing (and What It Isn't)
- Editing Philosophy: Enhance First, Then Edit
- Getting Started: Required Software
- Configuring Reaper Preferences
- Session Organization and File Structure
- Custom Actions: Simplifying Edits
- Track Structure: Parent/Child Hierarchy
- Audio Processing Chain
- Master Track Effects
- Editing Techniques
- Rendering Settings
- EQ and Compression: The Technical Detail
- Building a Reaper Template for Consistent Episodes
- Real Time Benchmarks from 1,000+ Episodes
- Common Mistakes and How to Avoid Them
- DAW Options Beyond Reaper
- FAQ
- About This Guide
What Is Podcast Editing (and What It Isn’t)
Podcast editing has three distinct stages that are easy to conflate:
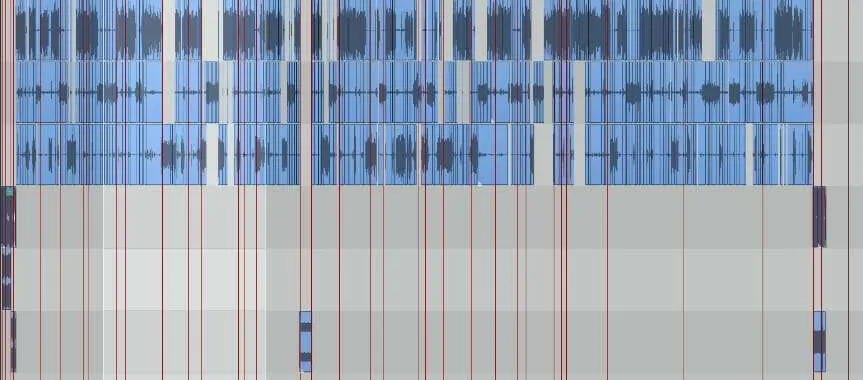
Enhancement is the sonic work that happens first. You apply processing to each track: noise reduction, EQ, compression, de-essing. This prepares the audio so you hear what the listener will hear during every subsequent step.
Editing is the subtractive work. You’re removing content that doesn’t serve the listener: dead air, false starts, off-topic tangents, filler words, crosstalk. The goal is a tight narrative. Because enhancement is already applied, you hear the final sound quality while making content decisions.
Mixing and mastering is the final stage. You balance levels between speakers, add music, blend everything into a single stereo file, check loudness against broadcast standards (typically -16 LUFS for podcast streaming platforms), apply final limiting, and render.
Running enhancement first matters. You hear finalized audio throughout — you catch issues the listener will actually hear, and you only go through the episode once instead of multiple passes.
Editing Philosophy: Enhance First, Then Edit
The workflow in this guide runs audio enhancement (noise reduction, EQ, compression) before content editing. This is deliberate. When you enhance first, you hear what your listener will hear throughout the entire editing process. You catch problems — resonance, sibilance, compression artifacts — while you’re making content decisions, instead of discovering them in a second pass after your edit is locked.
The alternative — editing raw audio and mixing afterward — means you’re making content decisions based on unprocessed sound. You might leave in a section that sounds fine raw but reveals noise floor issues once the processing chain is applied. Enhancing first eliminates that guesswork.
Our three-stage approach uses FX chains to structure this:
- Enhancement stage: Apply your processing chain (noise reduction, EQ, compression, de-essing) to each track before you start cutting.
- Editing stage: Make your content decisions — removing dead air, filler words, tangents, crosstalk — while hearing the processed audio.
- Mixing and mastering stage: Balance levels between speakers, add music, check loudness against broadcast standards, and render.
What we edit out:
- Dead air longer than 0.5 seconds between thoughts
- Repeated false starts (keep the second attempt unless the first attempt is meaningfully different)
- Filler words in high density (every “um” in a 30-second span), but preserve isolated fillers that sound natural
- Off-topic tangents that don’t serve the episode’s stated premise
- Crosstalk — overlapping audio from multiple speakers — which the automixer handles but manual editing improves
What we leave in:
- Natural pauses — silence that emphasizes a point
- Light breath sounds — completely breathless audio sounds unnatural
- Some filler words — a totally clean edit sounds robotic
- Conversational repairs — when a speaker self-corrects, that’s authentic
Getting Started: Required Software
Download the following tools:
- Reaper — An affordable DAW ($225 commercial license, or $60 for individuals and small businesses under $20K revenue, with a 60-day free trial). Professional-grade, not watered down.
- SWS Extension — Expands Reaper’s functionality for chaining actions and custom scripting.
- ReaPack — Provides access to custom packages including Automix scripts and community tools.
Free Third-Party Plugins
- DeBess by Airwindows — De-essing. Aggressive on harsh sibilants while preserving natural vocal character.
- NOVA by Tokyo Dawn Labs — Dynamic EQ. More surgical than a static EQ; responds to the signal level.
- EBU R128 JSFX — Loudness metering. Monitors integrated LUFS in real time during playback.
- TriLeveler 2 by Sonic Anomaly — Multi-stage compression. A free plugin that manages dynamic range across three compressor stages.
For a deeper comparison of DAW options including cost-over-time analysis, see our podcast recording and editing software guide.
Configuring Reaper Preferences
Critical setup steps to do once before your first real session:
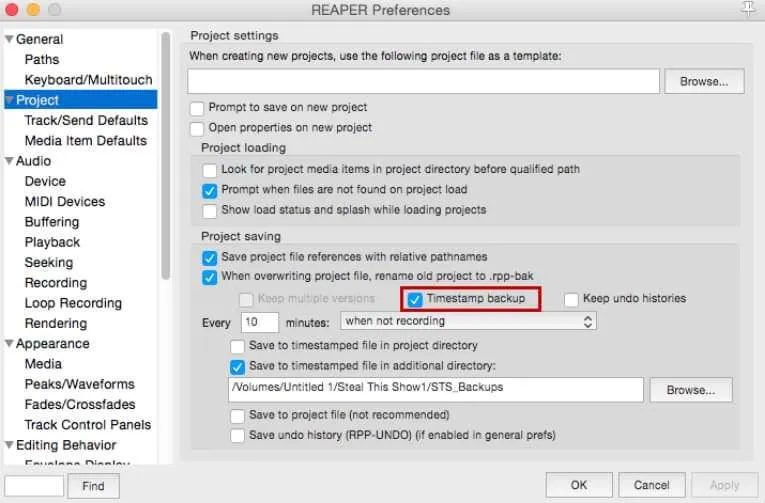
- Enable timestamp backups — Reaper saves versioned backup files automatically. This has saved us from corrupted sessions multiple times across 1,000+ episodes.
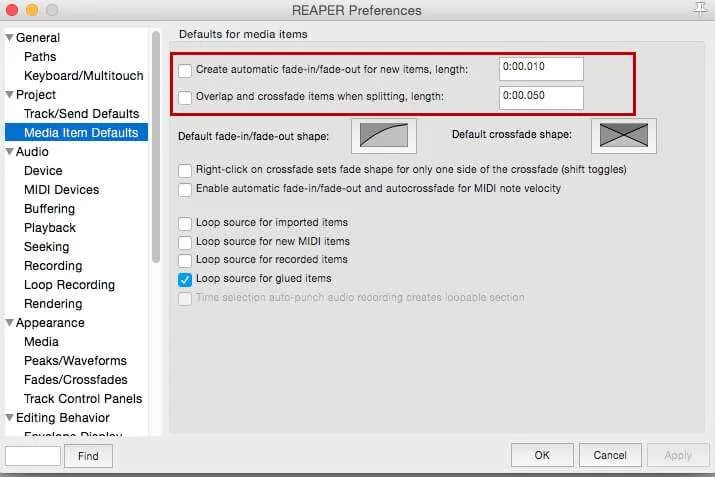
- Adjust media item defaults to prevent unwanted automatic fades — Default crossfade-on-overlap causes problems when you split items during content editing. Disable it.
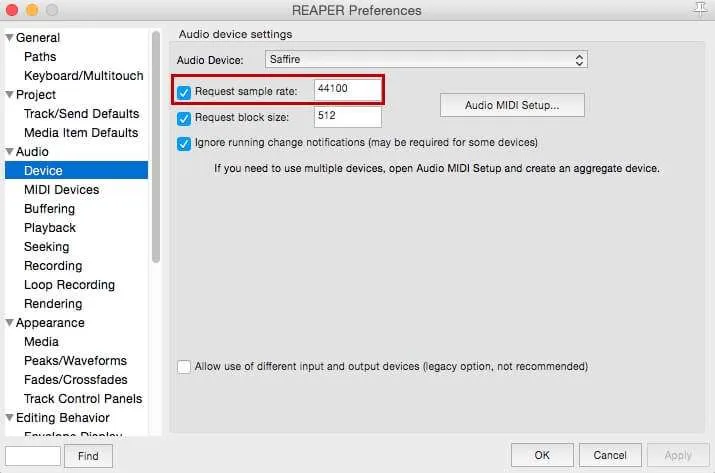
- Set sample rate to 44100 or 48000 Hz — Both are acceptable for podcast production. 44100 Hz is the standard for audio-only distribution and keeps file sizes smaller. 48000 Hz is standard for video production — use this if your podcast has a video component. The important thing is to pick one and stay consistent across all your sessions.
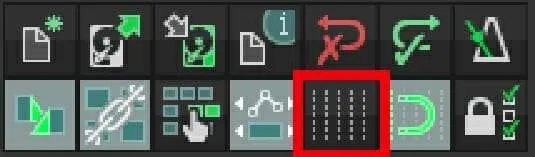
- Disable the grid system for precise editing — Grid snapping forces your cuts to beat positions, which makes no sense for speech editing. Disable it and rely on the waveform display.
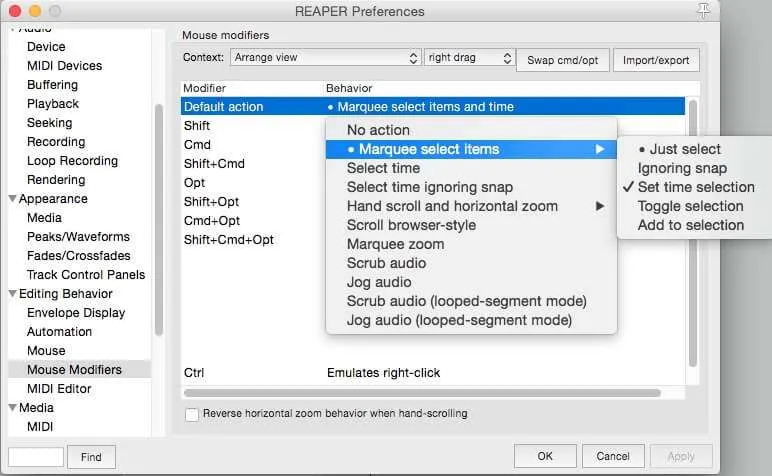
- Configure mouse modifiers for efficient selection — Right-click-drag for time selection, left-click-drag for item selection. This combination allows you to select content to remove and delete it without switching tools.
Session Organization and File Structure
Consistent session organization is the highest-leverage investment you can make in your editing workflow. Every minute spent organizing the first episode of a series saves 30 seconds on every episode after it.
Folder structure we use at Podigy:
/[Client Name]/
  /[Episode Number] - [Title]/
    /raw/         --  unedited recording files
    /assets/      --  music, ads, intros, outros
    /exports/     --  final rendered files
    [Project].rpp
Naming convention for raw files: [PODCAST-INITIALS]_EP###_[SPEAKER-INITIALS]_raw.wav
Example: THL_EP047_RB_raw.wav, THL_EP047_GA_raw.wav
The podcast initials prefix keeps files organized when you’re working on multiple shows. The _raw or _processed suffix distinguishes source files from edited versions.
This matters when you’re working on episode 200 and need to find a source file from episode 47. Standard naming means you don’t think about it.
Track labeling in session: Name every track before you start editing. “Host” and “Guest” are fine for solo edits. For client work, use first names. Color-code by speaker if your client has multiple guests.
Custom Actions: Simplifying Edits
Create three primary shortcuts to dramatically reduce editing time. These are the highest-ROI customizations in Reaper for podcast editing:
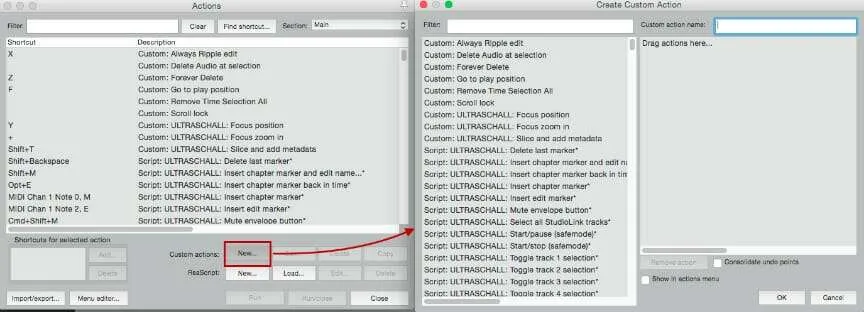
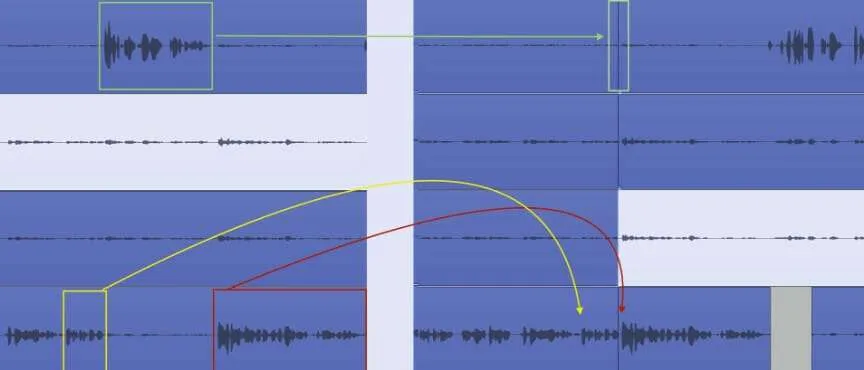
1. Ripple Edit with Crossfade
Removes selected content, closes the gap, and automatically crossfades adjacent clips in a single button press.
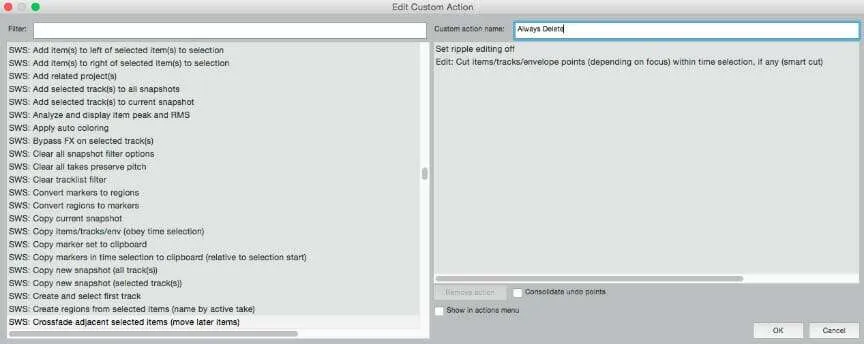
2. Smart Delete
Removes selected audio from its position without ripple-editing (doesn’t affect downstream timing). Use this when you want to delete isolated noise without shifting the rest of the episode.
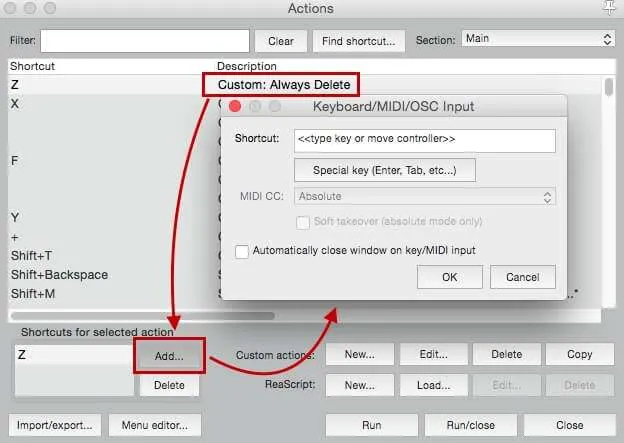
3. View Navigation
Jumps the view to the current playhead position. When you’re making edits and the timeline has scrolled away, this snaps back immediately.
These customizations reduce what would be 3-9 user actions per edit to single-button operations. At 1,000+ edits per episode (realistic for a tightly-scripted show), this is 2-3 hours saved per episode.
Track Structure: Parent/Child Hierarchy
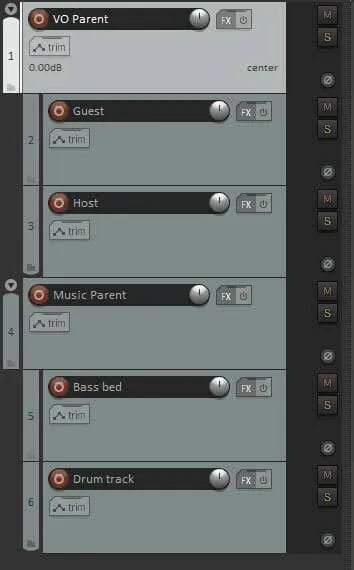
Organize your session with a hierarchical structure that separates individual processing from group processing:
| Track Type | Purpose | Effects Applied |
|---|---|---|
| Child tracks | Individual speaker sources | Denoising, EQ, peak limiting |
| Parent tracks | Groups (e.g., all voices) | Compression, de-essing |
| Master track | Final output | Loudness metering, brick-wall limiting |
This separation matters for a specific technical reason: de-essing on the parent track responds to the combined signal of all speakers. If two speakers sibilate at the same time (rare but it happens), the de-esser catches it. If you only de-ess individual tracks, simultaneous sibilance slips through.
Parent tracks also make level balancing faster. If a guest is consistently louder than the host, you adjust the parent track fader rather than re-automating every individual clip.
Audio Processing Chain
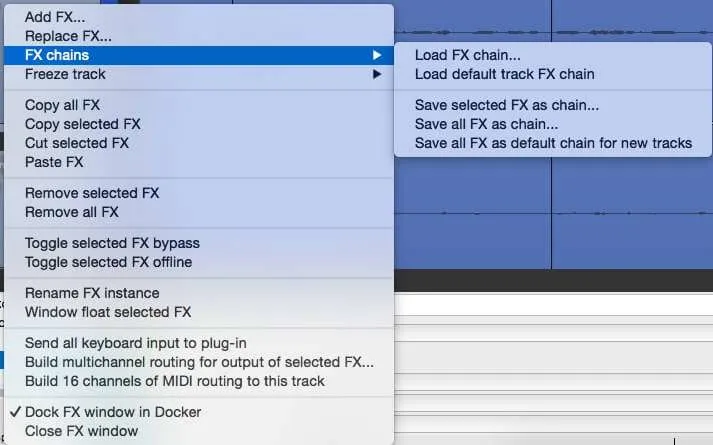
Apply processing before you start content editing, so you hear the finished sound while making editorial decisions. The sequence within the chain matters — changing it changes your results.
Processing order rationale: Noise reduction first, EQ second, compression third. Noise reduction happens before everything else because EQ can amplify noise floor artifacts that should have been removed first. If you boost low-mids before running noise reduction, you’re also boosting the room hum. Clean the signal first, then shape it, then control dynamics.
Automixer
The Automixer emulates the Dugan Automixer — a hardware unit originally designed for broadcast mixing boards that modulates gain based on which microphones are actively receiving signal. This reduces mic bleed without completely muting unused tracks.
The key benefit: unlike hard on/off approaches, the Automixer creates smooth gain reduction, which sounds natural even when speakers talk over each other. It maintains a consistent noise floor across all tracks rather than creating jarring silence-to-noise transitions.
Noise Reduction
Before EQ, run noise reduction on each child track. Use Reaper’s built-in ReaFir in “Subtract” mode or a dedicated noise reduction plugin — not a noise gate. Noise gates reduce audio to complete silence when signal drops below a threshold, which creates an inconsistent noise floor. Listeners hear the room tone appear and disappear with every sentence, which is more distracting than consistent low-level noise.
Instead, use spectral noise reduction that learns a noise profile from a silent section and subtracts it from the entire track. This maintains a consistent noise floor while reducing the overall level of unwanted sound.
ReaFir noise profile setup:
- Find a 2-3 second section of silence in the recording (no speech, just room tone)
- Open ReaFir on the child track and set mode to “Subtract”
- Check “Automatically build noise profile”
- Play the silent section so ReaFir captures the noise profile
- Uncheck “Automatically build noise profile” — it now subtracts that learned noise from the entire track
Dynamic EQ (NOVA)
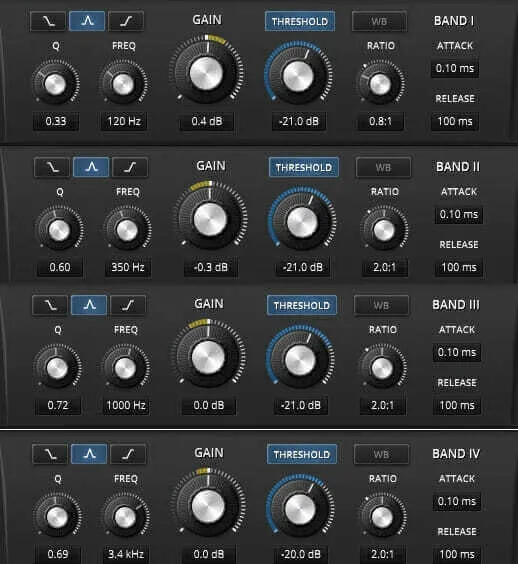
Apply NOVA as the second plugin in the child track FX chain. Use specific frequency band settings to:
- Emphasize intelligible speech frequencies — see our EQ settings guide for podcasters for specific band values
- Reduce muddiness in the low-mids (typically 200-400 Hz)
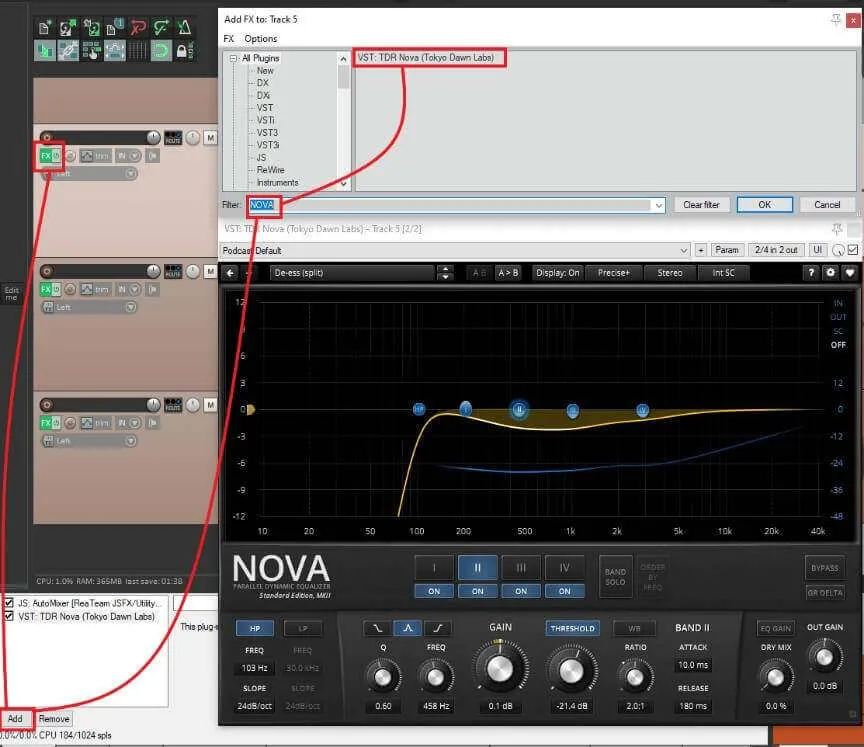
- Control resonance in problem areas (boxy room sounds typically live around 300-500 Hz)
Compression (TriLeveler 2)
Apply compression at the parent track level, after the child tracks have been processed individually. TriLeveler 2 manages dynamic range across three compressor stages automatically — it’s a “set it and forget it” approach:
- Target: -16 LUFS
- Auto Input: Enabled
- Noise Floor: Adjusted per episode to prevent room tone amplification
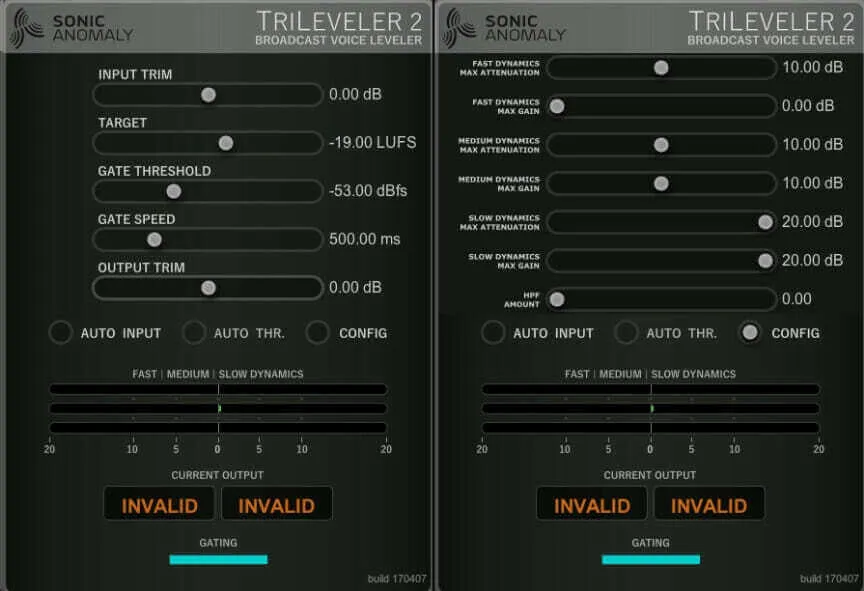
A note on compression ratios from 1,000+ episodes: The most common mistake we see from DIY podcasters is over-compressing vocals. A 4:1 ratio with a -20 dB threshold crushes the natural dynamics that keep listeners engaged. TriLeveler 2’s auto mode stays out of trouble, but if you’re using a manual compressor plugin, keep your ratio at 2:1 to 3:1 and use a higher threshold (-12 to -8 dB) rather than a lower threshold with a higher ratio.
The most common compression mistake in podcast editing is a 4:1 ratio with a -20 dB threshold — this crushes vocal dynamics. Keep compression ratios at 2:1 to 3:1 with a threshold of -12 to -8 dB for natural-sounding podcast audio.
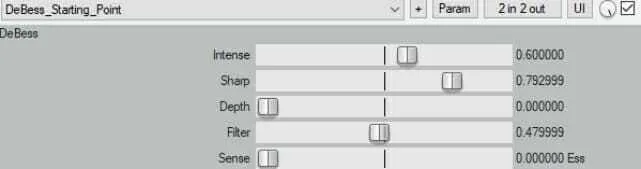
De-essing (DeBess)
Apply DeBess at the parent track level after compression. De-essing after compression is correct signal flow — compression can increase the perceived intensity of sibilants (since it brings up quiet sounds), so de-essing after compression catches the artifacts that compression creates.
- Intensity: Controls the amount of processing. Start at 50% and adjust to taste.
- Sharpness: Selectivity of frequency targeting. Higher sharpness means more precise sibilant detection.
- Depth: Maximum reduction applied. Keep this under 8 dB or the effect becomes audible as a lisp.
Master Track Effects
Two essential plugins on the master track:
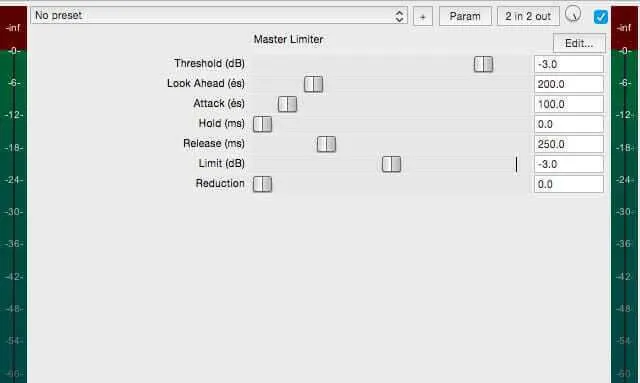
- JS: Master Limiter — Set ceiling to -3.0 dB. This is a brick-wall limiter that prevents any clipping in the rendered file, even if a peak sneaks through earlier in the chain.
- EBUR128 Loudness Meter — Real-time monitoring targeting approximately -16 LUFS integrated. Most podcast streaming platforms target -14 to -16 LUFS. We target -16 to give platforms headroom to normalize without distortion.
The loudness target is the final checkpoint before rendering. If your integrated LUFS is reading below -18 after a full listen-through, your compression settings need adjustment — either the threshold is too high or the ratio is too low.
Editing Techniques
Removing Dead Air and Filler Words
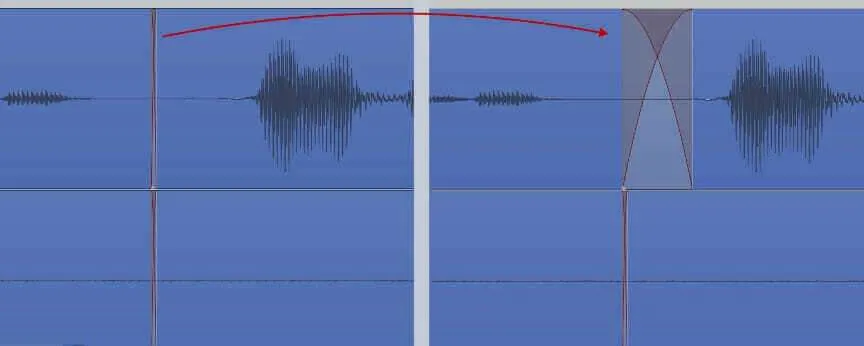
Right-click and drag to select unwanted content, then press your Ripple Edit shortcut to automatically remove and crossfade the remaining audio. The crossfade prevents audible clicks at the edit point.
Speed tip: Make all filler word edits in a single pass rather than mixing filler word removal with crosstalk removal and breath editing. Your brain works faster when focused on one type of edit at a time.
Handling Crosstalk
Rather than relying solely on the automixer to reduce mic bleed, manually remove audio from the unused microphone tracks when crosstalk is audible. The automixer reduces it — manual editing eliminates it.
Use Smart Delete (not Ripple Edit) for crosstalk removal. You don’t want to shift the timeline — you just want to silence that section of the secondary track.
Processing Breaths
Balance naturalness with reduction: delete the entirety of the breath clip, then ripple-edit out half of the resulting silence. This prevents artificial-sounding vocals while reducing distracting breath sounds.
Completely removing all breaths makes the speaker sound like a text-to-speech system. Keeping every breath at full amplitude makes listeners uncomfortable. The half-silence technique lands in the natural middle.
Adding Music
When layering music under dialogue, follow this processing sequence on the music track:
- Apply EQ to reduce frequencies around 80-120 Hz and 2-8 kHz. This cuts the frequency ranges that most overlap with vocal intelligibility.
- Reduce the volume fader by 8-12 dB relative to the voice tracks
- Apply a slow fade (2-4 seconds) at the point where dialogue begins, not where music starts
The result: music provides atmosphere without fighting vocals for frequency space.
Batch processing tip: When building a full season (10-12 episodes) that share the same intro and outro music, batch-process the music tracks by creating a template session with music already placed and leveled. Applying music individually to 12 episodes takes approximately 3-4 hours. Loading a template with it pre-placed takes under 20 minutes for the entire season.
Rendering Settings
Final export recommendations for talk-oriented podcasts:
| Setting | Value | Rationale |
|---|---|---|
| Format | MP3 (Constant Bitrate) | Universal compatibility, streaming platform support |
| Bitrate | 96 kbps | Adequate for mono voice; 128 kbps for music-heavy shows |
| Sample Rate | 44100 or 48000 Hz | Match your session sample rate; no conversion artifacts |
| Channels | Mono | Voice-only podcasts: mono reduces file size 50% with no quality loss |
| Loudness Target | -16 LUFS | Platform normalization headroom |
Stereo vs. Mono: If your podcast is voice-only, mono is the right choice. You lose nothing and cut your file size in half. Stereo is appropriate if you use music with distinct left/right elements or if your production includes spatial audio effects.
Pre-render quality checklist:
- Integrated LUFS between -16 and -14 (full episode playback)
- True peak not exceeding -3 dBTP
- No clipping on master track (confirmed via limiter activity meter)
- Intro and outro music fade correctly at episode start/end
- All ad reads balanced to match episode vocal level
- File exported as mono (for voice-only) or stereo (for music-heavy)
- First 30 seconds and last 30 seconds spot-checked in rendered file
Running this checklist takes 3-4 minutes per episode and has caught export errors, clipping issues, and mislabeled files before they reach a client.
EQ and Compression: The Technical Detail
This section goes deeper on the two most impactful processing tools in the chain. Skip to Rendering Settings if you’re comfortable with EQ and compression fundamentals.
EQ for Podcast Vocals: What to Target and What to Avoid
Podcast vocal EQ isn’t about making voices sound better in isolation. It’s about making them intelligible on earbuds, in cars, and through phone speakers. Those environments have different problems:
Phone speakers roll off low frequencies below 150 Hz. Boosting 80-100 Hz sounds warm in your studio monitors and muddier than expected on most phones.
Earbuds emphasize the 2-5 kHz range, which is where vocal harshness and sibilance live. A boost in that range that sounds clear on your studio headphones will sting on earbuds.
Car speakers are unforgiving of low-mid buildup (200-400 Hz). The boxy, honky quality that casual listeners describe as “tinny” or “cheap-sounding” usually lives here.
Our EQ approach after 1,000+ episodes:
- High-pass at 80 Hz: Remove low-end rumble and mic handling noise without affecting vocal fundamentals (human voice rarely goes below 85 Hz in conversational speech)
- Cut 200-400 Hz by 2-4 dB (dynamic): Reduce the boxiness from recording in rooms with hard surfaces
- Boost 1-3 kHz by 1-2 dB: Vocal presence and intelligibility range
- High-shelf boosts in the air range (10-12 kHz): Leave it alone unless the recording is genuinely dull; boosting air on an already-bright recording creates harshness
The key word in the second bullet is “dynamic” — NOVA’s dynamic EQ only applies the cut when the problematic frequencies exceed a threshold. Static cuts in that range can make voices sound thin during quiet passages.
For specific frequency values and NOVA band settings for common recording environments (bedroom, office, treated room), see our dedicated EQ settings guide for podcasters.
Compression: What It Actually Does to Podcast Audio
A compressor reduces the dynamic range of audio — the difference between the loudest and quietest moments. For podcast vocals, this has a specific benefit: guests who speak inconsistently loud or quiet become easier to listen to.
Key parameters:
Threshold: The level at which compression kicks in. Set it too low and you’re compressing the entire signal, including quiet passages. Set it too high and you’re only catching peaks. For podcast vocals, -12 to -8 dB is usually right — you’re catching the louder moments without compressing the normal conversation.
Ratio: How much you reduce signal above the threshold. 2:1 means a 2 dB increase above threshold becomes a 1 dB increase in output. 4:1 is fairly aggressive. 8:1 and above is limiting behavior.
Attack: How fast the compressor responds to signal above threshold. Too fast (under 5 ms) and you kill transients — the consonants that give speech its intelligibility. Too slow (over 50 ms) and loud peaks slip through before the compressor reacts. 10-20 ms is a starting point for speech.
Release: How fast the compressor lets go after the signal drops below threshold. Too fast and you hear the compressor breathing. Too slow and you get sustained gain reduction that makes voices sound flat. 100-300 ms works for most podcast vocals.
TriLeveler 2 manages all of these automatically, which makes it an excellent free option. (For our client work at Podigy we use paid tools, but this guide focuses on free tools available to the community.) When you’re editing your own show and want more control, these parameters are where to start.
Building a Reaper Template for Consistent Episodes
A session template is a saved Reaper project file with all your tracks pre-configured, your FX chains loaded, and your routing set up. Starting each episode from a template rather than from scratch saves 15-25 minutes per episode and eliminates the class of errors that come from rebuilding the same session incorrectly.
What goes in a template:
- Track layout — Child tracks for Host, Guest 1, Guest 2; parent tracks for Voices, Music, SFX; master track with limiter and loudness meter
- FX chains — All plugins loaded on each track with your baseline settings. Automixer on the parent Voice track. ReaFir (noise reduction) and NOVA on child tracks. TriLeveler 2 and DeBess on the parent. Master limiter and EBUR128 on master.
- Routing — All child tracks routed to their parent; all parents to master
- Markers — Start marker, episode content start marker (after intro music), outro start marker. These give you reference points for pacing and loudness measurements.
- Render preset — Your final render settings (MP3, 96 kbps, mono, matching your session sample rate) saved as a named preset so you don’t re-enter them
How we build and maintain our template at Podigy:
We maintain one template per client, not one universal template. Client A uses a 30-second branded intro with a specific music bed; Client B uses a cold open. Maintaining separate templates means zero time spent re-placing music or re-configuring routing for each client’s format.
When a client changes something permanent — new intro music, new ad format, adding a co-host — we update their template once, and every subsequent episode inherits the change automatically.
Template payoff at volume:
At 10 episodes per month, a 15-minute template startup time reduction saves 150 minutes (2.5 hours) per month. Over a year, that’s 30 hours saved from a single template. The first template takes about 45 minutes to build properly. Return on investment is measured in weeks, not months.
A single Reaper session template saves 15 minutes per episode at setup. At 10 episodes per month, that is 30 hours saved per year — from a 45-minute one-time investment in building the template.
Real Time Benchmarks from 1,000+ Episodes
Realistic editing time estimates based on our production history. Use these to scope client work and set expectations for your own editing schedule.
| Episode Type | Length | Editing Time | Mix+Master | Total |
|---|---|---|---|---|
| Solo host, clean recording | 30 min | 45 min | 20 min | 65 min |
| Interview, good mic technique | 45 min | 75-90 min | 25 min | 100-115 min |
| Interview, poor mic technique | 45 min | 2-3 hours | 40 min | 2.7-3.7 hours |
| Panel (3+ speakers) | 60 min | 3-4 hours | 45 min | 3.75-4.75 hours |
The 2:1 rule: For a well-recorded 45-minute interview, expect roughly a 2:1 ratio of editing time to raw recording time — 75-90 minutes. Poor recording conditions can push this to 4:1 or worse. This is why our audio cleanup guide emphasizes fixing problems at the source.
Podigy’s production logs show a 2:1 editing ratio for well-recorded interviews — 75-90 minutes to edit a 45-minute episode. Poor recording conditions push this to 4:1 or worse, adding 2-3 hours per episode.
Where time goes: In a typical 45-minute interview, filler word removal takes 20-30 minutes, dead air removal takes 15-20 minutes, crosstalk cleanup takes 10-15 minutes, and the audio processing chain setup takes 10-15 minutes (less if you’re loading a saved template).
Common Mistakes and How to Avoid Them
Based on Podigy’s client onboarding experience, these are the editing mistakes we encounter most frequently from independent editors and first-time podcasters:
1. Over-compression Setting a 4:1 ratio with a -20 dB threshold crushes vocal dynamics. Listeners stop noticing the content and start noticing the strange, lifeless audio. Keep ratios at 2:1-3:1 and thresholds above -12 dB.
2. Placing music before the content edit is final Placing music before your cuts are locked means re-editing the music every time you trim a section. Apply your processing chain and complete your content edit first, then place music.
3. Removing all pauses Podcast editing software that auto-removes silences often targets pauses that are doing real work — the beat before a punchline, the pause after a strong statement, the moment a speaker gathers a thought. Use auto-silence removal cautiously, and always preview before committing.
4. Skipping the Automixer for multi-mic setups Without the Automixer, all microphones are open at all times. Every mic picks up every other speaker, keyboard noise, chair movement, and room tone. The Automixer reduces this to the mic that’s actually receiving signal.
5. Not monitoring loudness until the final mix If you discover you’re at -20 LUFS integrated at the render stage, you’ll need to go back and re-process. Monitor your EBUR128 meter throughout the mix so you can adjust in real time.
6. Missing the rendering step check Always listen to the first 30 seconds and last 30 seconds of the rendered file before delivery. We’ve caught incorrect file exports, clipping issues, and misaligned channel exports this way.
7. Using destructive editing in the wrong place
Some editors use audio editors (Audacity, etc.) for spectral repair or noise reduction before importing into their DAW. This is “destructive” — you’re permanently modifying the source file. If you do this, always work from a copy, never the original recording. We keep a /raw/ folder of unmodified source files and only ever edit copies.
8. Ignoring stereo width on intro music If your intro music is mastered in stereo and you’re publishing mono, check how the stereo collapse sounds. Some stereo music has hard left/right content that cancels out in mono, making the intro sound thin or creating phasing artifacts. Check by soloing the mono output before rendering.
9. Not checking final loudness on the actual target platform LUFS meters in your DAW show integrated loudness across the whole file. But if your episode starts with 30 seconds of music before the voice comes in, the first minute may read at -22 LUFS before the loudness meter catches up. Spot-check loudness at the 5-minute mark of the episode, not just from the integrated final reading.
10. Skipping documentation for recurring shows If you’re editing 10+ episodes of the same show, write down your EQ, compression, and noise reduction settings after the first episode you’re happy with. A one-page settings sheet per client costs 10 minutes to write and saves significant time reconstructing “what did I do last time?” six months later.
DAW Options Beyond Reaper
Reaper is our recommendation for serious podcast editing, but it’s not the only option. Here’s a quick comparison of tools used by the podcasters we work with:
| Tool | Cost | Learning Curve | Best For |
|---|---|---|---|
| Reaper | $225 commercial ($60 small business) | High | Power users, high-volume editing |
| GarageBand | Free (Mac) | Low | Beginners on Mac |
| Audacity | Free | Medium | Budget-conscious, basic editing |
| Adobe Audition | $23.99/month | Medium | Teams already in Adobe CC |
| Descript | $24/month | Low | Transcript-based editing, AI tools |
| Hindenburg | $399 one-time (or $12/month) | Medium | Journalists, narrative podcasts |
Why Reaper for volume: At the 1,000+ episode volume we edit at Podigy, Reaper’s cost structure and customizability are unmatched. GarageBand is excellent for beginners but hits a ceiling on track count and routing complexity. Descript’s transcript-based editing is fast for content edits but limited for audio engineering work.
For a detailed breakdown with cost-over-time analysis, see our podcast software comparison.
FAQ
How long does it take to edit a 1-hour podcast? For a well-recorded interview, estimate 2-3 hours for editing + mixing. A poorly-recorded interview with heavy noise or crosstalk can take 4-6 hours. Solo episodes with tight scripting typically run 1.5-2 hours.
Do I need a DAW to edit a podcast? No. Tools like Descript let you edit by cutting the transcript. For basic editing tasks — removing filler words, trimming segments — transcript-based editing is faster. For full audio production including EQ, compression, and mixing, a DAW gives you the control you need.
What’s the difference between editing and mixing? Editing is removing content you don’t want. Mixing is adjusting how the remaining content sounds. Editing is the story decision; mixing is the sonic decision. In our workflow, we apply audio enhancement (noise reduction, EQ, compression) before editing so we hear finalized audio while making content decisions, then handle final mixing and mastering (level balancing, music, loudness) after the edit is locked.
What LUFS should a podcast target? -16 LUFS integrated for streaming platforms (Spotify, Apple Podcasts). Some editors target -14 LUFS. We use -16 because it gives platforms headroom to normalize without artifacts.
Should I export mono or stereo? Mono for voice-only podcasts. You cut file size in half with no perceptible quality difference for listeners on earbuds or phone speakers. Use stereo if your show has music with meaningful left/right separation.
How do I reduce background noise without making it sound processed? Use spectral noise reduction (like Reaper’s built-in ReaFir in Subtract mode) rather than a noise gate. Noise gates reduce audio to complete silence when the speaker stops talking, creating an inconsistent noise floor that’s more distracting than steady low-level noise. Spectral subtraction learns the noise profile and removes it evenly, maintaining a natural sound. Start conservative and increase processing only if needed — over-applied noise reduction creates watery artifacts that sound worse than the original noise.
What’s the biggest time sink in podcast editing? Filler word removal, typically. For a conversational 45-minute interview, removing “um,” “uh,” “you know,” and false starts can take 25-35 minutes. This is the task most editors automate first — tools like Descript’s filler word removal handle this in seconds, though you should still spot-check the results.
Can I use AI to edit a podcast? For content editing tasks (filler word removal, silence removal, transcript-based cuts), yes — AI tools like Descript’s AI Producer and Riverside’s Magic Audio handle these well. For audio engineering work (EQ, compression, noise reduction, mixing), current AI tools automate the workflow but don’t replace the judgment calls about how a specific voice should sound in a specific recording environment. We use both: AI for the mechanical tasks, human ears for the sonic decisions.
Is podcast editing worth learning if I plan to outsource eventually? Yes, for two reasons. First, you’ll make better editorial decisions during recording when you understand what creates editing problems downstream. Second, you’ll give better briefs to an editor and catch quality issues that a non-technical client would miss. Spending 8-10 hours learning basic editing pays off even if you outsource every episode after that.
What recording issues can’t be fixed with free tools at the moment? Several:
- Clipping in the original recording (the red-line distortion from recording too loud) — once audio is clipped at the source, free tools cannot fully restore it
- Heavy reverb from recording in an echo-heavy room — noise reduction can reduce it but not eliminate it without artifacts using free plugins
- Two microphones recorded on one track — you cannot split a mixed-down file into separate speaker tracks with free tools
- Severe background noise that occupies the same frequencies as the voice — free tools can reduce it but not without some vocal quality degradation
Paid restoration suites (like iZotope RX) can handle some of these better, but prevention at the recording stage is always more effective than repair. This is why our audio cleanup guide focuses on the recording setup, not just the post-production techniques.
How much does podcast editing cost if I hire out? Freelance editors typically charge $25-75 per audio hour depending on scope and experience. A 45-minute episode with light editing might run $35-50. An episode requiring heavy noise reduction, multiple guests, and polished mixing might run $80-120. Production companies like Podigy offer monthly production packages that include editing, mixing, show notes, and distribution. See our production packages for current pricing.
About This Guide
Author: Riley Byrne, founder of Podigy
Company context: Podigy is a podcast production company that has produced 1,000+ episodes across 200+ B2B shows. We handle editing, mixing, mastering, show notes, and distribution for B2B and media companies, across solo, interview, panel, and scripted formats.
How this guide was developed: The workflow described here is what our production team uses for every episode we deliver. Time estimates come from our internal production logs, not industry surveys. Plugin settings (noise reduction, compression ratios, LUFS targets) reflect what we’ve converged on after testing and iteration across hundreds of sessions.
When this was last reviewed: March 2026. We update this guide when our workflow changes significantly or when a new tool meaningfully improves on what we document here.
Prefer to hand off editing entirely? See our production packages if you’d rather skip the learning curve. Or learn what Podigy’s production service covers to see if it’s the right fit.