EQ is the single most impactful tool in podcast post-production. A well-placed cut removes the boomy room sound that makes a guest sound like they recorded in a closet. A high-pass filter kills the rumble that fatigues listeners without their ever knowing why. Done right, EQ is invisible — listeners just hear a voice they trust.
This guide covers everything you need to apply EQ confidently to podcast voices: what each frequency range does, how to choose the right filter type, and the specific settings we use across interview, solo, and panel formats.
In This Guide
- About This Guide
- What Is EQ and Why Does It Matter for Podcasts
- EQ Types: Parametric, Graphic, and Filter-Only
- Filter Types: Bell, Shelf, High-Pass, Low-Pass, and Notch
- Key Frequency Ranges for Podcast Voices
- The Philosophy: Cutting vs. Boosting
- Scenario-Specific EQ Presets: Interview, Solo, and Panel
- Common Voice Problems and Their EQ Fixes
- DAW-Specific EQ Guidance: Reaper and GarageBand
- Placement in the Effects Chain
- Common Mistakes
- Frequently Asked Questions
- Key Takeaways
About This Guide
This guide was written by Riley Byrne, founder of Podigy. Podigy is a podcast production company that has produced 1,000+ episodes across 200+ B2B shows. EQ settings and recommendations in this guide come from real production sessions across interview, solo, and panel formats. Last updated: March 2026.
What Is EQ and Why Does It Matter for Podcasts
EQ (equalization) is the process of adjusting the volume of specific frequency ranges within an audio signal. In simple terms: you turn up or down specific parts of the sound spectrum.
For podcasts, EQ serves two purposes:
- Problem removal — cutting frequencies that make voices sound boomy, thin, nasal, or muddy
- Presence shaping — subtle boosts that make a voice cut through and hold listener attention
EQ does not fix a bad recording environment. If your room has significant reverb or background noise, address those with acoustic treatment or noise reduction first. EQ works on the tonal character of sound — not on masking separate noise sources.
EQ Types: Parametric, Graphic, and Filter-Only
Understanding which EQ to use saves time and produces cleaner results.
Parametric EQ is what you want for podcast production. It lets you control three parameters per band: frequency (which part of the spectrum), gain (how much to cut or boost), and Q (how wide or narrow the adjustment). Most professional DAW EQ plugins are parametric. Examples: Reaper’s ReaEQ, Logic Pro’s Channel EQ, FabFilter Pro-Q.
Graphic EQ divides the spectrum into fixed bands (typically 10 or 31) with sliders. You can only control gain — frequency and Q are fixed. Graphic EQs are fine for live sound reinforcement but less precise for podcast voice work where you need to target a specific resonance at, say, 340 Hz rather than the nearest fixed band.
Filter-only EQ applies only high-pass or low-pass filtering. Useful as a quick first step (every podcast voice benefits from a high-pass filter at 80–100 Hz) but not sufficient for full voice treatment.
Our recommendation: Use a parametric EQ. Reaper’s ReaEQ is free with Reaper and powerful enough for professional results.
Filter Types: Bell, Shelf, High-Pass, Low-Pass, and Notch
Each filter type has a different shape and serves a different purpose. Knowing when to use which prevents you from over-processing.
Bell (Peak/Dip) — The most common filter for surgical EQ work. Affects a frequency and the frequencies around it in a bell-curve shape. The Q setting controls width: high Q (e.g., Q=8) affects a narrow range; low Q (e.g., Q=0.7) affects a broad range. Use bell filters to cut problem resonances or add targeted presence.
High Shelf — Boosts or cuts all frequencies above a set point. A high shelf boost at 8–10 kHz adds air and presence. A high shelf cut above 15 kHz rolls off harshness in low-bitrate recordings.
Low Shelf — Boosts or cuts all frequencies below a set point. A low shelf cut below 80 Hz reduces rumble and handling noise. Use sparingly — cutting too much low shelf creates a thin, telephone-call sound.
High-Pass Filter (HPF) — Passes high frequencies and cuts everything below a cutoff point. Also called a low-cut filter. Apply this to every podcast track, typically at 80–100 Hz with a 12 or 18 dB/octave slope. This is the single most universally useful EQ move in podcast production.
Low-Pass Filter (LPF) — Passes low frequencies and cuts everything above a cutoff point. Less common in podcast EQ but useful for rolling off harsh high-frequency artifacts above 16–18 kHz.
Notch Filter — Extremely narrow bell cut designed to surgically remove a specific resonant frequency (e.g., a 60 Hz electrical hum or a 1.2 kHz nasal honk). High Q (Q=10 or above) with a deep cut (8–12 dB).
Key Frequency Ranges for Podcast Voices
Understanding what each frequency range contributes to voice helps you make targeted decisions rather than guessing.
| Range | Name | What It Does | Recommendation |
|---|---|---|---|
| Below 80 Hz | Rumble Zone | Minimal useful vocal info; desk thumps, plosives, room rumble, HVAC | High-pass filter — cut this on every track |
| 80–120 Hz | Warmth and Body | Vocal richness and weight; absence creates thin, wispy sound | Careful reduction if boomy; never cut entirely |
| 150–300 Hz | Proximity/Mud Zone | Proximity effect in condenser mics stacks here; home office room modes cluster in this range | Cut 2–4 dB at 200–280 Hz to tame mud without losing body |
| 300–800 Hz | Room Reflections | Boxiness and room resonance; too much makes voices sound “recorded in a room” | Identify and cut specific resonances with narrow bell |
| 1–2 kHz | Nasal Honk Zone | Can make voices sound pinched and nasal when peaks exist here | Notch cut at the specific frequency if present |
| 2–5 kHz | Clarity and Presence | Fundamental intelligibility zone; shapes how clearly words cut through | Small 1–2 dB boost for presence; be careful above 3 kHz |
| 5–8 kHz | Sibilance Zone | ”S” and “T” sounds — critical for listener comfort | Use a dedicated de-esser; avoid EQ adjustments here |
| 8–12 kHz | Air and Brightness | Adds sense of openness and professionalism when subtly boosted | Gentle 1–2 dB high shelf boost if voice sounds dull |
| 15 kHz+ | Harsh Upper Range | Adds sparkle in music; creates harshness in compressed podcast audio | Roll off gently above 15–16 kHz with low-pass filter |
The Philosophy: Cutting vs. Boosting
Cut first. Boost rarely.
This is the single most important EQ principle for podcast production, and it is different from how most music production EQ is taught.
Here is why:
- Boosting a frequency amplifies everything in that range, including background noise and room artifacts
- Cutting an unwanted frequency removes the problem at its source
- After cutting, the perceived result is often the same as boosting the opposite — cut 300 Hz mud and you perceive more clarity, without touching the clarity range at all
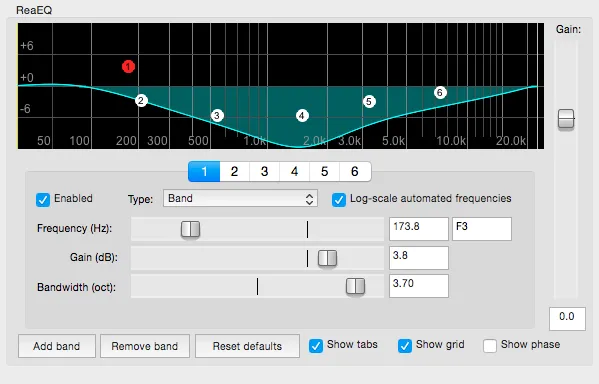
In practice: If a voice sounds muffled, do not boost 3–4 kHz. Instead, cut 200–350 Hz. You will achieve the same perceived result with a cleaner signal and less added noise.
The one case where boosting makes sense is air and presence — a gentle shelf boost above 8 kHz is additive by nature and less likely to create noise issues because there is not much noise energy up there in a typical vocal recording.
Scenario-Specific EQ Presets: Interview, Solo, and Panel
These are the EQ starting points we use at Podigy across our production work. They are not universal — every voice, mic, and room requires individual treatment — but these settings reflect the patterns that come up on 80%+ of the episodes we produce.
Interview Format (Two or More Speakers, Condenser Mics)
Interview format is our most common scenario. The typical setup: host and guest each on a condenser microphone (Rode NT1, Audio-Technica AT2020, or similar), recording in a home office or quiet room. Proximity effect from close-miked condensers stacks with home office room modes at 200–280 Hz. This creates a boomy, telephone-in-a-box quality that is the number one EQ problem we fix.
| Band | Frequency | Gain | Filter Type | Q | Reason |
|---|---|---|---|---|---|
| 1 | 80 Hz | Cut | High-Pass (12 dB/oct) | — | Remove rumble, desk noise, HVAC |
| 2 | 240 Hz | -3 dB | Bell | 1.2 | Proximity effect + room mode in home office condensers |
| 3 | 350 Hz | -2 dB | Bell | 0.8 | Box resonance in small rooms |
| 4 | 2.5 kHz | +1.5 dB | Bell | 0.9 | Restore clarity after low-mid cuts |
| 5 | 9 kHz | +1.5 dB | High Shelf | — | Air and openness on condenser mics |
| 6 | 15 kHz | Cut | Low-Pass (6 dB/oct) | — | Roll off harshness |
Why 240 Hz specifically: We cut at this frequency on over 80% of our interview episodes. Condenser microphones used at 6–10 inches have proximity effect that peaks around 200–280 Hz. In home offices with parallel walls, room modes cluster in the same range. The result is a buildup that makes voices sound like they are speaking from inside a cardboard box. A 3 dB cut at Q=1.2 removes the worst of it while keeping low-end body intact.
Podigy applies a 240 Hz cut at Q=1.2 to over 80% of interview episodes. This single EQ move addresses proximity effect buildup in condenser mics and home office room modes simultaneously.
Solo Narration Format (Single Host, Dynamic or Condenser Mic)
Solo narration is more controlled. One voice, one mic, often with intentional acoustic treatment. Dynamic mics (Shure SM7B, Electro-Voice RE20) are more common here because they reject room noise better. The EQ treatment is less aggressive.
| Band | Frequency | Gain | Filter Type | Q | Reason |
|---|---|---|---|---|---|
| 1 | 100 Hz | Cut | High-Pass (18 dB/oct) | — | Clean cut with steeper slope on dynamic mics |
| 2 | 220 Hz | -2 dB | Bell | 1.5 | Proximity effect on dynamic mics (less than condenser) |
| 3 | 500 Hz | -1.5 dB | Bell | 0.7 | Broad mid reduction for a more intimate sound |
| 4 | 3 kHz | +1 dB | Bell | 1.0 | Presence boost for vocal definition |
| 5 | 10 kHz | +1 dB | High Shelf | — | Subtle brightness on dynamic mics |
Note on dynamic mics: The SM7B and RE20 have a natural proximity effect but it peaks lower (around 100–200 Hz) and is less pronounced than condenser mics. The EQ curve is smoother overall and less corrective.
Panel / Roundtable Format (3+ Speakers)
Panel formats are the hardest to EQ because you have multiple voices, often recorded with different mics or at different levels, and the guests are usually not in a treated room. The priority is consistency across tracks, not perfection on any individual track.
| Band | Frequency | Gain | Filter Type | Q | Reason |
|---|---|---|---|---|---|
| 1 | 80 Hz | Cut | High-Pass (12 dB/oct) | — | Standard rumble removal |
| 2 | 200 Hz | -2 to -4 dB | Bell | 1.0 | Reduce mud; adjust per speaker |
| 3 | 400 Hz | -1.5 dB | Bell | 0.7 | Reduce boxy quality common in remote guests |
| 4 | 2 kHz | +1 dB | Bell | 1.0 | Uniform presence boost for all tracks |
| 5 | 15 kHz | Cut | Low-Pass (6 dB/oct) | — | Consistency across variable recording setups |
Key technique for panels: Apply the same high-pass and low-pass settings to all tracks first, then treat each voice individually. This makes the panel sound like it was recorded in the same room, even if it was not.
Common Voice Problems and Their EQ Fixes
These are the specific problems you will encounter most often, and what to do about them.
Boomy or Muddy Voice
Symptom: Voice sounds thick, heavy, or “speaking from a box.” Common with condenser mics in untreated rooms.
Fix: Bell cut at 200–280 Hz, Q=1.0–1.5, -3 to -5 dB. Sweep within that range until you identify where the worst buildup is, then cut there.
Thin or Weak Voice
Symptom: Voice lacks weight; sounds hollow or telephone-quality. Often from cutting too aggressively in the 80–200 Hz range, or from dynamic mics used at too great a distance.
Fix: Gentle low shelf boost at 100–150 Hz, +1 to +2 dB. Check that your high-pass filter is not set too high (above 100 Hz will create thinness).
Nasal Voice
Symptom: Voice sounds “honky,” pinched, or whiny. Common in certain voice types and exacerbated by some mic placements.
Fix: Use a narrow notch filter. Set Q=6–8 and sweep slowly between 800 Hz and 2 kHz. When you find the frequency that makes the honk worst, cut it 4–6 dB. Start at 1 kHz and work from there.
Sibilance (Harsh “S” Sounds)
Symptom: “S,” “T,” and “SH” sounds are sharp, piercing, or distorted.
Fix: This is not an EQ problem — use a de-esser. A de-esser applies dynamic compression only when energy peaks in the 5–8 kHz range. Trying to fix sibilance with a static EQ cut will make the voice dull between harsh consonants. See our guide to de-essing for podcasts.
Room Resonance
Symptom: A specific pitch or drone color underneath the voice; a “hollow” or “echoey” quality.
Fix: Use narrow bell cuts (Q=4–6) and sweep slowly between 300 Hz and 1 kHz. Resonances have a specific pitch — when you find it, cut 3–6 dB. Multiple resonances are common in rectangular rooms; you may need 2–3 separate notch cuts.
Proximity Effect Buildup
Symptom: Voice sounds deeper and boomier than natural; exaggerated when close-miked. Worse with condenser mics than dynamic mics.
Fix: Bell cut at 150–280 Hz, Q=1.0–1.2, -2 to -4 dB. If using a condenser mic within 8 inches, this is expected — the cut is part of the standard EQ chain, not a special fix.
DAW-Specific EQ Guidance: Reaper and GarageBand
Reaper — ReaEQ
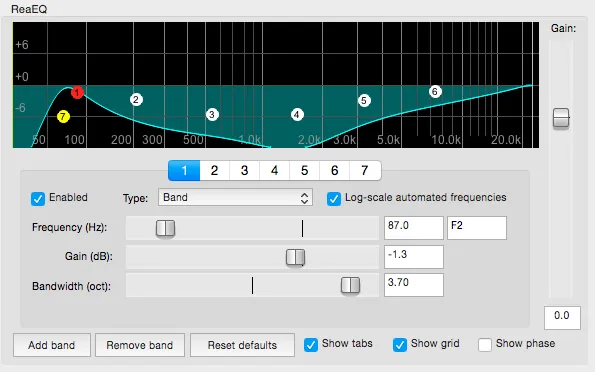
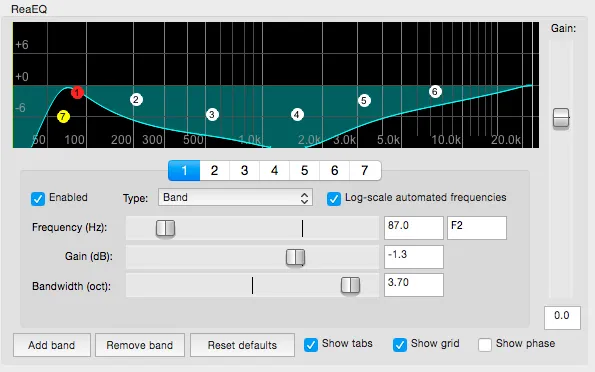
ReaEQ is Reaper’s built-in parametric EQ and one of the most capable free EQ plugins available. It ships with Reaper at no additional cost.
To add ReaEQ to a track:
- Click the FX button on the track
- Search for “ReaEQ” in the plugin list
- Double-click to add it
Setting up bands:
- Each band has three sliders: Frequency, Gain, and Bandwidth (Q)
- The Bandwidth control in ReaEQ is octaves, not Q — set Bandwidth to 0.5 octaves for a medium-narrow bell (equivalent to Q≈1.4); 0.2 octaves for a surgical narrow cut (Q≈3.5)
- Use the “Type” dropdown per band to select High Pass, Low Pass, Bell, High Shelf, Low Shelf, or Notch
- The visual EQ graph updates in real time as you adjust settings
Recommended starting setup in ReaEQ:
- Band 1: Type = High Pass, Frequency = 80 Hz, Bandwidth = 0.7 oct
- Band 2: Type = Bell, Frequency = 240 Hz, Gain = -3 dB, Bandwidth = 0.5 oct
- Band 3: Type = Bell, Frequency = 2500 Hz, Gain = +1.5 dB, Bandwidth = 0.6 oct
- Band 4: Type = High Shelf, Frequency = 9000 Hz, Gain = +1.5 dB
GarageBand
GarageBand’s Channel EQ provides a visual equalizer with eight bands. It is parametric but less flexible than ReaEQ (limited to 8 bands, fixed band types per position).
To add Channel EQ in GarageBand:
- Click the Smart Controls button (keyboard shortcut: B)
- In the Plugin area, click an empty slot
- Select EQ > Channel EQ
Setting up the interview preset in GarageBand Channel EQ:
- Band 1 (leftmost): High-Pass at 80 Hz, 12 dB/oct
- Band 2: Set to parametric bell, target 240 Hz, drag down to -3 dB
- Band 3: Set to parametric bell, target 350 Hz, drag down to -2 dB
- Band 6: Set to parametric bell, target 2500 Hz, drag up to +1.5 dB
- Band 7: High Shelf at 9000 Hz, +1.5 dB
- Band 8 (rightmost): Low-Pass at 15000 Hz
GarageBand limitation: You cannot adjust Q (bandwidth) as precisely as in ReaEQ. The default Q settings are reasonable for podcast work, but surgical notch cuts for nasal resonances are better handled by upgrading to Logic Pro, whose Channel EQ offers fully adjustable Q for true notch filtering.
Placement in the Effects Chain
Position EQ strategically within your processing chain:
- Noise reduction / denoising (removes broadband noise first)
- EQ (shape the clean signal)
- Compression (even out dynamics on the EQ’d signal)
- De-essing (control sibilance after compression)
- Limiting (final safety ceiling)
Placing EQ before compression ensures the compressor responds to the tonal character you actually want. If you compress first, the compressor may respond to low-end buildup that you were going to EQ out anyway, resulting in over-compressed, pumping audio.
For a deeper look at step three, see our guide to compression for podcasts. For recording software that makes this chain easier to set up, see our guide to top podcast recording and editing software.
Common Mistakes
Boosting instead of cutting first. Always identify and remove problem frequencies before adding anything. The perceived result of cutting mud is the same as boosting clarity — without amplifying noise.
Setting the high-pass filter too high. A high-pass filter above 100 Hz will remove vocal body and create a thin, unnatural sound. Start at 80 Hz and only go higher if there is a specific reason.
Using the same settings on every voice. These presets are starting points. Male voices recording at a distance versus a female voice at 4 inches from a condenser mic require completely different treatment. Use your ears.
Too many adjustments. If you have more than five or six active EQ bands on a single voice, you are probably over-processing. Each cut or boost narrows your options. Identify the two or three biggest problems and fix those first.
Ignoring room problems. EQ can reduce the perception of room sound but cannot eliminate a reverberant room. If the recording has significant reverb or room tone, acoustic treatment or noise reduction must come first.
Comparing with headphones that boost bass. Consumer headphones that boost low frequencies will make your EQ decisions sound different on flat reference monitors or earbuds. Use flat reference headphones (Sony MDR-7506, Audio-Technica ATH-M40x) for critical EQ work.
Frequently Asked Questions
What should I EQ first — the high-pass filter or the bell cuts?
High-pass filter first, always. Setting the high-pass removes the low-end noise that would otherwise influence where you think your mud problems are. After filtering, your bell cuts will be more accurate.
How do I know if I am cutting too much?
Toggle the EQ bypass on and off while listening. If the EQ’d version sounds thin, hollow, or unnatural in comparison to the raw signal, you have cut too much. Aim for the EQ’d version to sound like the raw version — but in a slightly better room with a better mic.
Should I EQ in mono or stereo?
Podcast audio should be monitored in mono during EQ. Podcast listeners frequently listen through one earbud, through phone speakers, or in a car — all mono or near-mono environments. Panning and stereo width are irrelevant; tonal balance in mono is what matters.
Can I use EQ to fix sibilance?
You can use a static EQ cut in the 5–8 kHz range to reduce sibilance, but this will make the entire recording sound dull between harsh consonants. A de-esser is the right tool because it only applies the cut when sibilance is detected. See our de-essing guide.
What Q value should I use?
For fixing specific resonances (boomy buildup, nasal honk): Q=1.0–2.0 for medium-width corrections; Q=4–8 for surgical notch cuts. For broad tonal shaping (adding warmth or air): use shelves instead of narrow bells. The narrower the Q, the more surgical and the more it sounds processed if overdone.
My guest sounds different from the host. How do I match them?
EQ each track independently to a target tonal balance. A useful technique: switch between host and guest tracks while listening to a consistent reference phrase. Cut the low-mid buildup on whichever track has more, boost presence on whichever sounds more recessed. The goal is not identical frequency response — it is a similar perception of “in the same room.”
Does EQ order matter when using multiple EQ plugins?
In practice, the order within a single EQ plugin does not matter — the EQ calculations happen simultaneously. If you are using two separate EQ plugins in series, the order can matter slightly for broad, overlapping adjustments. For most podcast work (high-pass + two or three bell cuts), a single parametric EQ plugin handles everything you need.
What is the difference between parametric and dynamic EQ?
Standard parametric EQ applies a fixed cut or boost regardless of the signal level. Dynamic EQ applies a cut or boost only when the signal exceeds a threshold, similar to a compressor but frequency-specific. Dynamic EQ is useful for controlling intermittent problems (e.g., a frequency that only gets boomy when the host leans toward the mic). For most podcast EQ work, standard parametric is sufficient.
Key Takeaways
- Apply a high-pass filter at 80 Hz on every podcast voice track — this one step removes the rumble and handling noise that makes audio sound amateur
- Cut before you boost: reducing mud at 200–280 Hz has the same perceived effect as boosting clarity, without amplifying background noise
- Use parametric EQ (ReaEQ in Reaper, Channel EQ in GarageBand) for precise control over frequency, gain, and Q
- Interview format typically needs a -3 dB cut at 240 Hz Q=1.2 for proximity effect and home office room modes — this is the most common fix in podcast production
- Match EQ to scenario: condensers in home offices need more correction than dynamic mics in treated spaces
- EQ belongs before compression in the effects chain so the compressor responds to the tonal character you want
A high-pass filter at 80 Hz applied to every podcast voice track is the single highest-leverage EQ move in podcast production — it removes rumble and handling noise that makes audio sound amateur without affecting vocal fundamentals.
Cutting mud at 200–280 Hz produces the same perceived clarity improvement as boosting the 2–5 kHz presence range, without amplifying background noise — always cut before you boost.
Want professional audio without building a production workflow from scratch? If post-production is taking time away from your message, Podigy handles the entire process — EQ, compression, de-essing, mastering, and show notes — for B2B podcasts. Or see how we work.