The Complete Guide To Podcast Editing
A great podcast is a combination of several factors. Choices made about subject matter, tone, hosts, guests and equipment will all shape the end result in some way. However! The one thing all great podcasts have in common is ample time set aside for post production. By this I mean that somewhere along the line, before the podcast is published, someone goes through and ensures the levels are right, the flow is consistent, the audio has been scrubbed of distractions (excessive noise, long spaces of dead air, over use of filler words, etc.) and the overall mix feels right. A good audio editor will be able to do this using audacity, but it will take a while. A great audio editor will do all of this and design a custom workflow to make it as easy as possible. By the end of this tutorial, we’re going to make you a great podcast editor who uses only 3 buttons to edit their podcast!
This guide will take you through the following:
1. Setting up Reaper actions that combine several elements of editing into a few button presses
2. Setting up FX Chains and templates to save time at the beginning of each new podcast. This includes using EQ, compression, gates, and other effects.
3. Putting it all together and actually editing our podcast
Each of our podcasts average about 1000 edits per hour. Each edit before implementing this system took between 3-9 user actions. Using this system, we make multiple edits with a single action. It might not seem like you’re saving much time over a single edit, but multiplied by a thousand, the time savings quickly add up!
Downloading Reaper and Plugins
For this tutorial, we’re going to be using Reaper, a digital audio workstation (DAW) that is not only powerful and customizable, but at only $60, it is also one of the most affordable DAWs on the market.
More than that, it comes with a 60 day trial period, and you can keep using it without any loss of features after the trial ends for free! You could continue to use Reaper forever without paying for it, but with all the customizability built in, and updates rolling out every 2 weeks, I think you’ll find after 2 months that the $60 price tag is more than worth it. Download Reaper here.
Next, we’re going to download The SWS Reaper extension, an open source add-on that expands the functionality of Reaper considerably. In this tutorial, we’re going to use SWS to make our button presses more effective by chaining together several actions. For instance, instead of a separate button press for deleting a piece of audio, joining the two split pieces of audio together afterwards, and then crossfading them to make the edit seamless, with SWS we’ll be able to consolidate all of those actions into a single press of a key. Download SWS here.
After SWS, we’ll next want to install ReaPack, which gives us convenient access to many custom packages for Reaper. In this tutorial we’ll be using a specific package included in it called Automix. Download ReaPack here. Make sure to follow the directions on that page up to and including the Synchronize Packages section. Once you’ve installed ReaPack, open Reaper and go to Extensions > ReaPack > Synchronize Packages. This updates your ReaPack with the latest JSFXs and actions. When you first synchronize ReaPack, you should see several hundred packages get installed.
Now we’re going to download some free 3rd party plugins. While Reaper has one of the best suite of plugins to be included with a DAW, the plugins we’re going to download have very specialized uses that are not easily remade with Reaper plugins, despite earlier versions of this guide insisting they were.
The first of these plugins is called DeBess by Airwindows. Chris Johnson is the sole developer behind the Airwindows moniker and he releases a new, free, incredibly polished and optimized plugin every week. For this guide, we’re going to use his DeBess plugin, a de-esser that works unlike most on the market, and allows you keep the high end of our tracks sounding clear while bringing down the “ess” sounds that have a habit of sounding too harsh. Download and watch Chris’ extremely detailed description of how it works here. Also consider donating to his patreon if your podcast starts to make money by using any of his tools!
Next up is the free version of the NOVA plugin by Tokyo Dawn Labs. Unlike a traditional equalizer that applies the same processing to the incoming signal no matter how loud or quiet it is, NOVA is a dynamic EQ, which means it can react to changes in the audio signal and apply more or less processing as needed. This will be very helpful in helping even out tones between different speakers. Download the free version of NOVA here.
After Nova is installed, we’re going to grab a very simple LUFS meter from TBProAudio. From this link scroll down the page until you get to the “Reaper JSFX plugins” and download the EBU R128 JSFX plugin. We’ll get into more detail when we start to use it, but a LUFS meter shows us how loud our audio is over time (very important for podcasts) and the range (in Loudness Units).
Finally, we’re going to download TriLeveler 2, from Sonic Anomaly. This is a “set it and forget it” type of plugin that is free to boot! The Tri Leveler works by having three different compressor/expanders working in tandem to make sure your audio is always at the level you want, without it sounding overly compressed or distorted. As of November 2019, the Sonic Anomaly site is down, so follow this link and use “Clone or Download” to download a zip file of all of Sonic Anomaly’s plugins.
Because Trileveler and our LUFS meter are Reaper-specific, it takes a little more effort to install them. First, unzip the package from the website, and in Reaper click on Options > Show REAPER resource path in Explorer/Finder, and we’re going to drop our downloaded zip file into Effects, and unzip. Make sure you download the JSFX version of Trileveler. After installing all of the plugins, restart Reaper to allow it to scan the new files.
Setting up Reaper Preferences
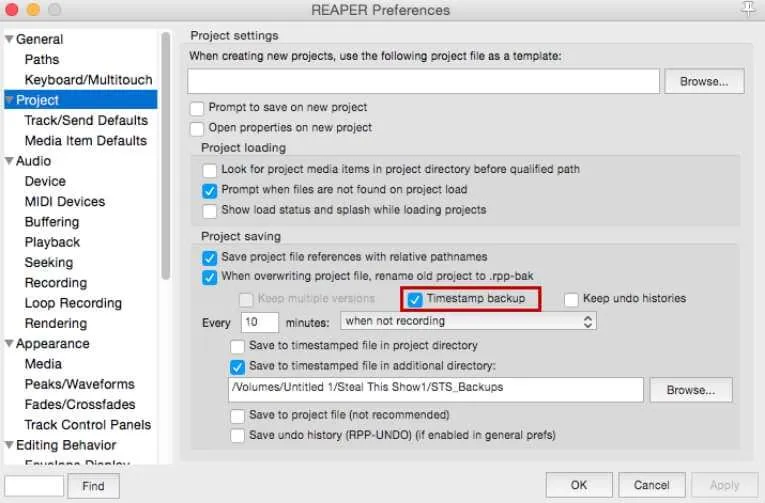
The greatest feature about Reaper is also the reason it is so intimidating to beginners: customizability. It is so feature-rich and flexible that you can run it across multiple computers, batch process files in a snap, sync up with others over the internet and write plugins on the fly! Consequently, there are a lot of little things we want to do right out of the box to fine tune Reaper to our specific needs. Lets first go to Reaper > Preferences > Project, and make sure that Timestamp backup is checked. Underneath, choose an interim that seems right to you, that you want Reaper to automatically backup your project file and then click Apply down in the right hand corner. Now, in the rare event that Reaper crashes, we’ll only ever have lost a few minutes of work!
Next, head to Media Item Defaults under the Project tab. Make sure Create automatic fade-in/fade-out for new items, length is unchecked, but that it has a timecode of 0.00.010. Similarly, uncheck Overlap and crossfade items when splitting, length, but make sure it has a timecode of 0.00.050. Reaper by default fades out the audio a bit on either side of an edit point (such as removing an “uhm”) which works well in music, but in a podcast that sudden fade in/out of audio can cause little clicks that are distracting to listeners. We’re going to make our own custom crossfades a little later using SWS, which looks at the timecodes in this menu to determine the length they should be.

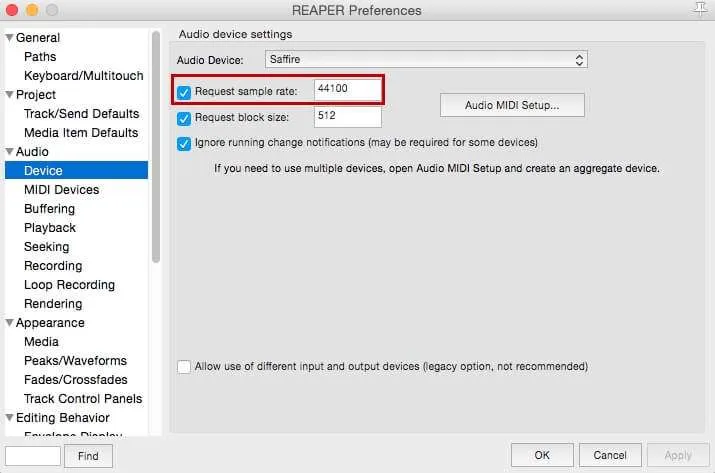
Now is also a good time to go to Audio > Device and make sure Request sample rate is set to 44100. It’s a very long and complicated reason as to why this is, but sufficed to say this has the potential to save you many headaches in the future when you cannot figure out why your audio and a guest’s audio recorded remotely are slowly drifting out of sync, or why your voices sound oddly pitched down through some web players.
The block size is how often your audio will update in Reaper, and affects latency. The smaller the block size the less latency, but more strain is put on your CPU and can cause audio dropouts. 512 is a good threshold for editing, but if you’re routing your audio out of Reaper into something like Skype or Twitch, try going with 128-256.
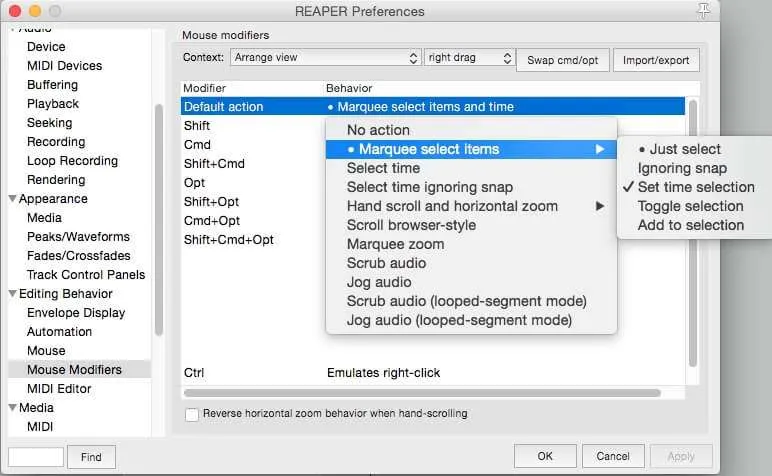
Finally, head to Editing Behavior > Mouse Modifiers, change the Context to “Arrange view” and “right drag”, and then double click on Default Action and select Marquee select items > Set Time Selection. It should now read Marquee select items and time. This will let us right click and drag to select time that we want to edit out with our X and Z commands now.
Finally, head to Editing Behavior > Mouse Modifiers, change the Context to “Arrange view” and “right drag”, and then double click on Default Action and select Marquee select items > Set Time Selection. It should now read Marquee select items and time. This will let us right click and drag to select time that we want to edit out with our X and Z commands now.
Make sure the grid system is disabled when you’re editing, by clicking on the grid button in the upper left hand corner of Reaper. This will allow for much more finesse when we’re trying to edit out “um”s that are in the middle sentences.

Setting Up Custom Actions
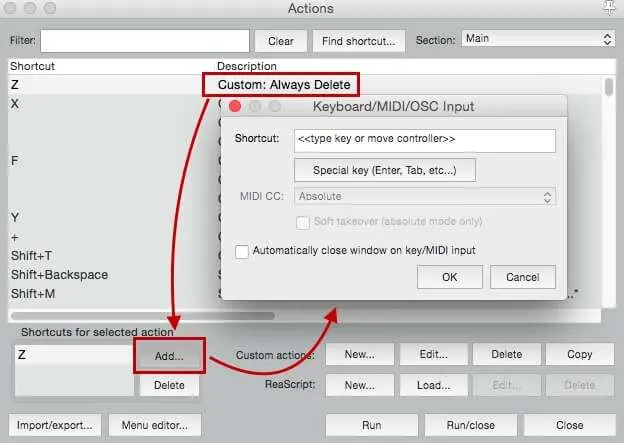
Now that we have our preferences in place, it’s time to start using some of the cool features in SWS. Head on over to Actions > Show Action List. We’re now greeted with something that might look like gobbledygook to you right now, but this is actually one of the coolest features in Reaper, the ability to make our own custom actions and chain them together to make powerful shortcuts for quick podcast editing. So head to Custom Actions and click New…. This will bring up a new menu where we can begin creating our time saving editing tools.
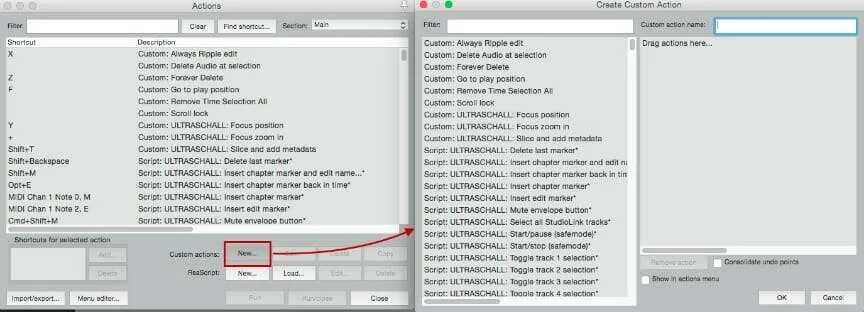
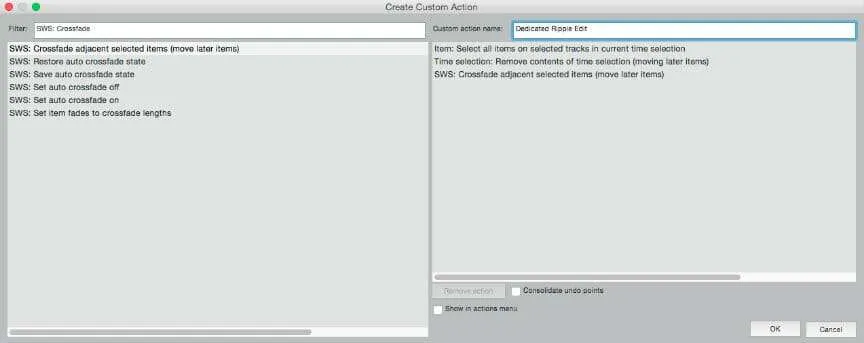
First, we’re going to make a custom Ripple Edit function that automatically crossfades the resulting clips for a smooth transition between them. A Ripple Edit (or Remove Time, Shuffle Edit etc.) is when audio in a certain time frame is cut across all tracks in project, and the audio behind the edit moves up to where the cut piece of audio was before. For instance, if a podcast has a segment of dead air, instead of deleting the dead air portion and moving the resulting audio clips individually across each voice track, trying to line them up perfectly again, with a few clicks you can do all the tracks at once and keep them perfectly in sync! Many DAWs have a Ripple Edit function, but they are somewhat clunky to implement and work against the natural flow of editing a podcast, so we’re going to make our own that suits our needs perfectly.
In the Filter bar, start typing until “Item: Select all items in current time selection” pops up and double click it to add it to our custom action. Do the same with “Time selection: Remove contents of time selection (moving later items)” and “SWS: Crossfade adjacent selected items (move later items)” [Ed Note: This item was renamed to “SWS: Crossfade adjacent selected items (move edges of adjacent items)”]. Name your action, and click OK. You’ve just created your first custom action in Reaper! If only you could talk to your past self, the one from the beginning of this guide. The things you could tell her. But I wonder if you would even recognize yourself? You’ve come a long way.
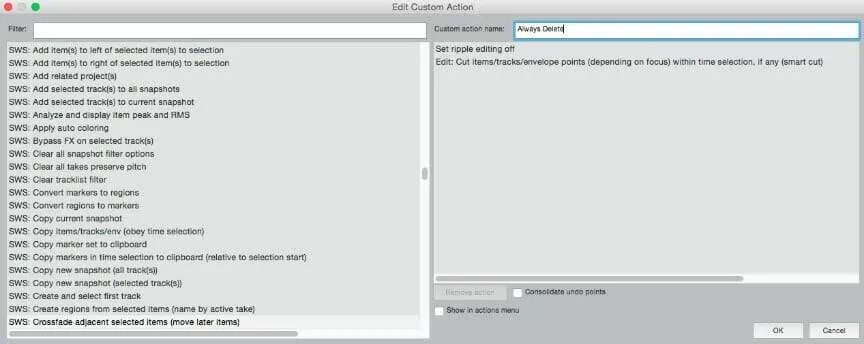
Next, we’re going to make another custom action, this one is basically a “smart delete” button. This is going to give us a shortcut that deletes only what we’ve highlighted, 100% of the time. The farther you dive into Reaper, the more you can take advantage of settings that can change the parameters of what the regular delete key looks at, and it is frustrating (not to mention time consuming!) trying to delete a little snippet of audio only to accidentally ripple edit the entire project, or delete the whole audio track! So following the same steps as before, we’re going to add Set ripple editing off and Edit: Cut items/tracks/envelope points (depending on focus) within time selection, if any (smart cut) and give it a custom action name.
Now it’s time to assign keys to our shortcuts. I personally like to use “X” and “Z” as they are close to each other, and Cmd + Z (Ctrl + Z on PC) is our undo function. This way they are nice and close to each other, and you don’t have to move your hand at all to undo an action. Finally, in the action menu, search “View: Go to play position” and assign it to “F”. This will allow us to do rolling edits, removing bits of audio with Z on the fly, and then catching up to the playhead once we have.
Optional: If you’re like me, you may also want to quickly bring down the sound of breaths in your audio. To do so create a new custom action called “Breathe Less” (or whatever seems appropriate for you) and add “Item: Split Items at time selection” followed by 10 instances of “Item: Nudge items volume -1dB“. I assign it to the letter “A” to keep it accessible to my left hand, and it can instantly bring down any highlighted breaths by 10 dB, which is oftentimes enough to still have it audible, but not so much so that your guest sounds like they are gasping for air.
Also Optional: Set “Options Cycle ripple editing mode” to “Q” on your keyboard. It’s helpful to be able to cycle through ripple moving and moving single items on the fly when you’re trying to get music to fit under your intro, and then move up the beginning of the interview quickly.
You will get some pop ups asking if you really want to change those assigned buttons to our new actions, and click yes to each. When you’re editing a podcast, 90% of your time will be spent cutting, ripple editing and undoing, and we’ve just reduced those actions to 3 keys that are all within reach of each other! You’ll save so much time not having to dig through menus, or looking down at the keyboard to make sure you’re hitting a complex key binding, you can easily double or even triple your efficiency at editing over other programs. But we’re not done yet…
Setting up Our Track Structure
Now seems like a good time to go over how we’re going to structure our tracks in Reaper. We want to group tracks together that are similar, for clarity (having all voice tracks grouped together, for example), gain staging and processing. In Reaper, the easiest way to group tracks is in a Parent/Child track hierarchy, where the audio from Child tracks are sent to the Parent track, which then sends the amalgamated audio from all of its child tracks to the Master track (most times). By grouping our tracks in a Parent/Child structure, it gives us a chance to get all the tracks in our podcast sounding similar to each other quickly. We apply effects to child and parent tracks differently as well:
Child Tracks are where we apply effects that work best when only dealing with a single source of audio. Denoising, peak limiting (a type of very quick compression), and EQ are all good examples of effects that are most effective when applied to individual tracks. The goal of processing on the child tracks is to prep them to make them as similar as the other tracks in the same Parent track as possible, so the Parent track is receiving roughly the same type of input as consistently as possible.
Parent Tracks are where we apply effects that are designed to make audio from several child tracks sound as similar as possible. All of our voice-over audio could go to a single parent track, for example to make sure that levels stay the same between speakers. We can think of parent tracks as “gluing” together several of our tracks to make them sound cohesive. Here we’ll typically be applying our compression, de-essing, and broader EQ settings.
The Master Track can be thought of as the parent of parent tracks (a grandparent track, perhaps?). In the same way that child tracks are used to prep our audio for parent tracks, we use parent tracks to make sure the master track effects have to do as little work as possible.
Creating Parent tracks in Reaper is very simple. Press CTRL/CMD + T to create a new track. Name it according to what the children tracks will be, and then click and drag the child tracks under the parent track so that the blue line is slightly indented. Now our child track is routed to send audio to the parent track, instead of the master track!
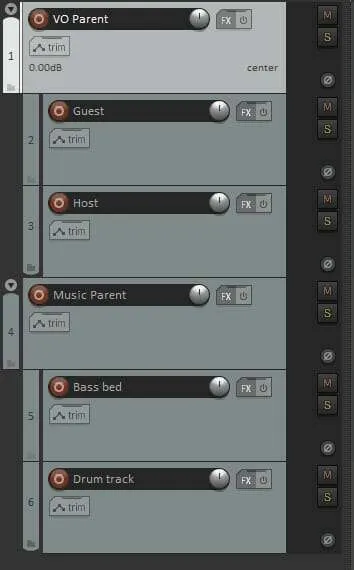
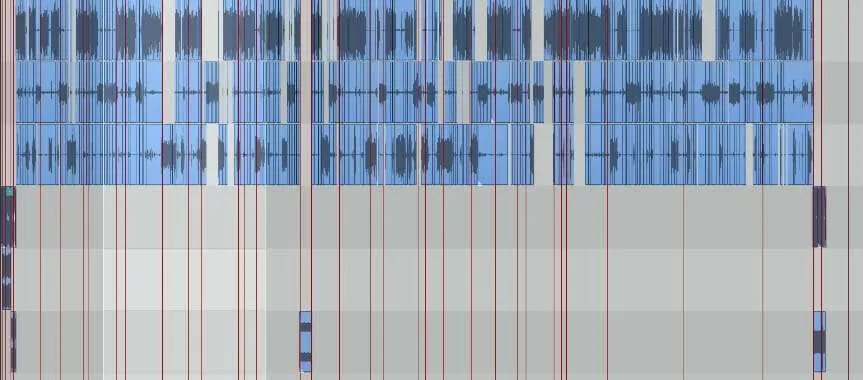
Here we’ve created two Parent tracks to separate our music tracks from our interview.
Setting Up Our Automixer
One thing that is tragically underutilized in most podcast production is proper EQ and compression. Almost any decent quality mic will record your voice well enough that, with a little polish and shine in Reaper, will get you sounding like the pros over at NPR. Our goal in this section is to set up a series of plugins that will tame even the wildest of vocal performances, and save those chains as easily recallable “FX Chains” in Reaper so the perfect podcast sound is only ever a few clicks away!
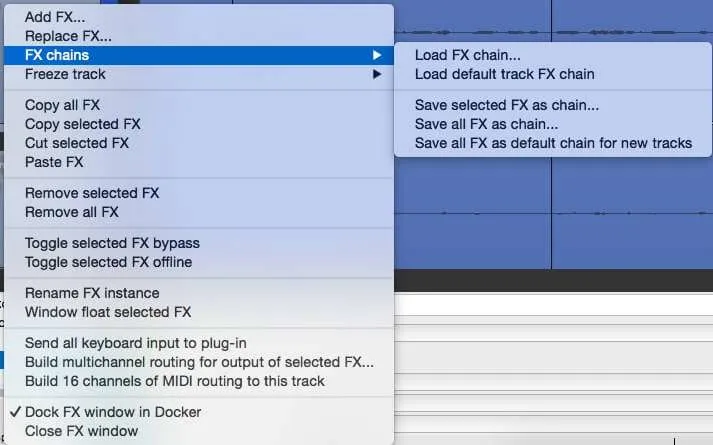
Right clicking in any FX box will allow you to choose FX chains that we can use to quickly get our tracks sounding great.
To start with, we’re going to add an instance of Automixer to each of our child voice tracks of audio that was recorded in the same room together. If it is a roundtable 4-person Let’s Play, put this on every player’s (including the DM!) track. What this effect does is emulate the Dugan Automixer, a device that modulates the gain of microphones based on how much those microphones are contributing to the total signal of all the mics being used.
First, click on the “FX” button underneath the name of one of your tracks. This should open up a new window that looks fairly blank, save for “Add” and “Remove” down at the bottom. Click on “Add” and in the new window type “Automixer” in the Filter text box and double click to add that effect to our track.
If you are not seeing Automixer, make sure you have synchronized ReaPack and restarted Reaper. The first time you sync, several hundred actions and JSFX should be installed. Instructions on how to sync are described at the beginning of the guide.
In our example of a 4-person Let’s Play podcast, generally only one person will be speaking at a time, but all 4 microphones will be picking up that person’s audio as mic bleed. The automixer plugin looks at the incoming volume levels of all 4 mics, sees that the one right in front of the speaker is much louder than the other three, so it brings down the volume of the 3 microphones that are not in use. Crucially, this plugin never mutes tracks completely, unlike gating, which allows for a much smoother transition between speakers and maintains a more consistent noise floor.
What this means for you, dear editor, is that using this plugin you will spare yourself many hours of deleting mic bleed across tracks, removing only the most egregious violations of podcasting etiquette.
The only place this plugin can fail you is when there is a lot of quick back and forth between folks, or laughter. I suggest setting the RMS Window Length for each instance of the plugin to 90, and keep the RMS Window Type as rectangular. If someone is an aggressive affirmator, or laughs quite a bit louder than they speak, using the “breathe less” action we set up earlier in the guide can help balance the levels.
Setting Up Our EQ
Let’s start with setting up our EQ on the child voice tracks. An EQ (or equalizer) shapes our audio based on frequency bands. Find out more about EQ for podcasts here. We’re going to make an EQ curve that clears out the frequencies we don’t want and leaves the ones we do relatively untouched, and we’re going to do it dynamically with our new NOVA plugin. First, click on the “FX” button underneath the name of one of your tracks. This should open up a new window that looks fairly blank, save for “Add” and “Remove” down at the bottom. Click on “Add” and in the new window type “NOVA” in the Filter text box and double click to add that effect to our track.
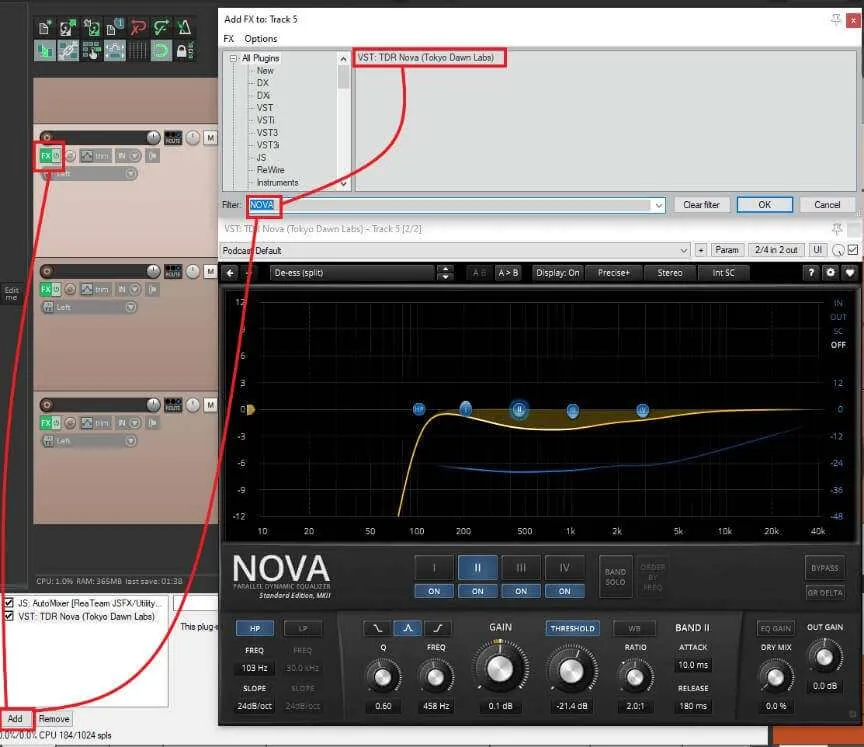
On the new NOVA screen that pops up, we’re going to start inputting settings to make our dynamic EQ start to clear out some of the muddier frequencies in our audio, and give a little boost to the low end of our voice to give it a nice, smooth sound. What we’re trying to do with this processing is emphasis the frequencies of voices that our ears use to make sense of words, and bringing down a lot of midrange frequencies where muddiness, resonances and echos/reverb tends to build up. Take this as a good starting point to tweak to your liking to find a sound that works for your show.
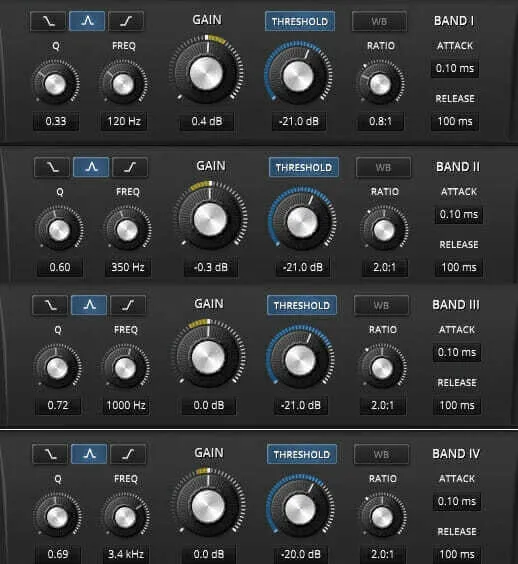
Here we will briefly go over the various knobs and settings present on the NOVA plugin and what to set them at:
HP/LP buttons: These are High Pass and Low Pass respectively. High pass “passes over” the high frequencies and only affects the frequences below the threshold (in the picture above, the High Pass filter FREQ is set to 103 Hz, meaning all frequencies above 103 are unaffected, while the frequencies below are attenuated at a SLOPE of 24 decibles per octave). Low Pass similarily “passes over” lower frequencies, only affecting those frequencies above the FREQ.
Set your HP FREQ to 100 Hz, Slope to 24db/oct and keep the LP switched off.
I, II, III, IV: These are our frequency bands. Each one corresponds to a blue node in the spectrum analyzer above, and clicking on one will update the settings directly below to reflect how each band works with incoming audio. Make sure each is turned on.
\_, _/\_, _/: These are our filter shapes. We want to make sure the _/\_ shape is chosen for each (I, II, III, IV), as this will have the least amount of effect on how the other bands work.
Q and FREQ: These affect the steepness and placement of our filter, respectively. A higher Q will have a more shallow effect across a larger number of frequencies, whereas a smaller Q will have a larger effect on a smaller number of frequencies. The former is good for subtler changes, while the latter is great for controlling problematic frequencies.
GAIN: Gain is the boost or attenuation applied to the frequency band. Frequencies within the band will be amplified by this amount.
THRESHOLD: Threshold affects at what amplitude the band will start to apply processing at. A lower threshold means the band will begin the apply processing on quieter signals, while higher thresholds will only affect louder signals.
RATIO: Whereas threshold tells us when a band will begin to apply processing, RATIO tells us what the band will do. A Dynamic EQ works a lot like a multiband compressor, where the loudness of a certain frequency range will be compressed by the ratio we set. For instance, a 2:1 ratio will mean for every 2 dB over the threshold our audio within a band is, the band will only allow the audio to go up 1 dB over the threshold.
ATTACK and RELEASE: These tell our dynamic EQ how long to wait before applying processing (attack) and how long to continue processing the signal after it passes back below the threshold (release) As we’re using this to sort out troublesome frequencies, we’ll want to apply processing fairly quickly, and have our release times quite quick as well.
EQ Gain: This is a global setting, and it can be used to match the loudness of the output from NOVA to the loudness of the input. In a compressor this is known as a Makeup Gain. As we’re using the dynamic settings on the NOVA, we will always have this set to OFF.
DRY MIX: Dry mix blends the original signal back in with the processed signal. This can be helpful when trying to do “parallel processing”, however we’ll always have it set to 0.0%.
OUT GAIN: This knob lets you boost or attenuate the entire output signal by this amount. We’ll have it set to 0.0 dB
To save time, I’ve taken screenshots of each individual band’s setting so you can quickly match them up, and we’ll go over what we’re doing below.
Like the previous version of this article, we’re still going with an unconventional EQ, and I emphasize to use these settings (and this guide) as a starting point to creating your own presets. The keenly-eyed among you will have noticed that we’re using a 0.8 ratio on our first band, and this is not to clear out frequencies, but to actually boost the fundamental frequency of most folks’ voices. The other bands are used gently clear out the muddiness in our voices, giving us a smoother sound. If you’re looking to make changes to this preset, I recommend starting by playing around with the frequencies first, then the threshold, Q and ratio in that order. Oftentimes you’ll find the troublesome frequencies by moving one of the bands around and you’ll be able to hone in on how much you want to take out with the frequency and threshold alone. To find out more about how EQ works, check out our article!
Trileveler: An Unconventional Compressor
Now it’s time to use the Trileveler we downloaded all the way at the beginning of this guide! This is a really powerful effect that takes a lot of the thinking out of getting a consistent tone out of our vocal tracks, and it’s going to make sure each person in our podcast always sound like they are at the same level, which is why we’re going to put it on our VO Parent track. It works by compressing and expanding the incoming signal, so that the audio sounds more consistent without sounding over compressed, and it can be set up in a few clicks!
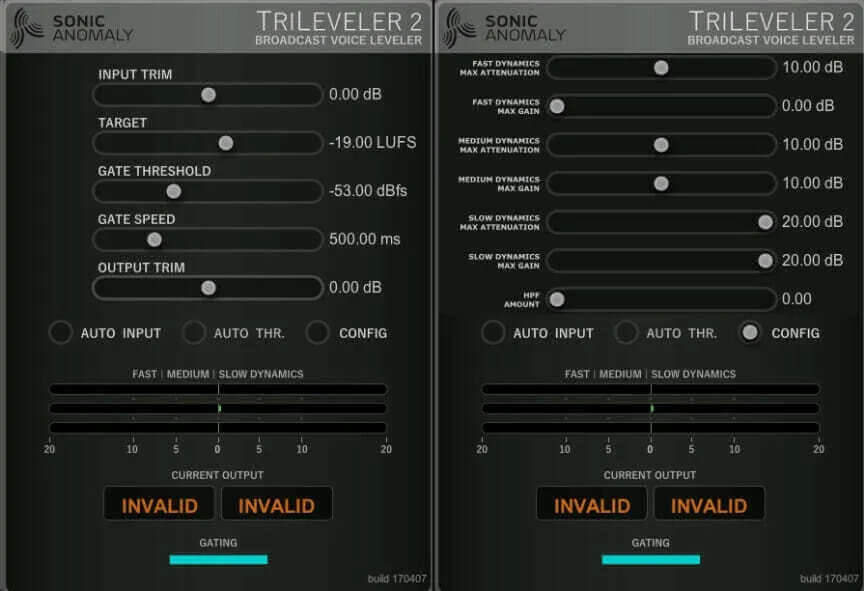
We’ll quickly go through each option and what it is doing, but on the whole the only thing we’re going to change here is our Target to -16 LUFS.
Input Trim is the adjustment of amplitude to the incoming audio. To have the audio sound as natural as possible, we want to have our compressors as little as possible. One way to do this is to increase or decrease the volume of the incoming signal to get it as close to our target LUFS as possible before we compress anything. We use Trileveler on the parent track of our VO tracks so that it has a constant stream of actual audio coming in (it doesn’t work so well with long periods of silence and can boost the signal up considerably in a way of looking for voices).
Generally speaking, you want to set the input trim so that the Medium Dynamics bar at the bottom of the plugin is as close to the middle as possible. One of the benefits of having Trileveler on the Parent VO track is that we can set Auto Input on to have the input trim adjust according to our incoming signal automatically. Use with caution, however! Trileveler has no lookahead function, so it will take a second to adjust to large changes in volume (between a soft spoken guest and a loud host, for example).
Target is the loudness level we are aiming our audio to have. You can see a real-time readout down at the bottom of the plugin along with the LU range, which is the difference between the loudest and quietest parts of the output signal. You may want to look at changing the input volume of your child tracks if the LU range is consistently over 5.
Gate Threshold is the volume level that the gate begins to engage at. If the audio signal is below this level, the gate will start attenuate the audio so as not to bring the volume up of quiet passages and blow our listeners’ ears out. The Auto Thr. function works similarly to the Auto Input button, adjusting the gate threshold relative to the incoming signal. Again, use with caution as too high a threshold can start to cut off quieter passages, but too low of a setting will bring up the volume of room tone.
Output Trim works a lot like Input trim, raising or lowering the volume of the audio after it has been processed by the compressors. Use it if for whatever reason you’re not hitting the LUFS rating you’re shooting for.
On the second page of the plugin we have several Max Gain sliders, which tells each of the Fast/Medium/Slow compressors the upper limit of how much they can change the signal. The defaults should be good for the vast majority of cases.
Finally, the HPF Amount allows you to bring up the lowest frequency Trivleveler will include when figuring out compressor settings. Useful if you have a guest who is constantly bumping the table.
De-Essing to Tame Harshness
The last plugin we’re going to add is DeBess, which we downloaded from Airwindows. This is going to help reduce all the nasty sibilance (think words with excessive “sss” sounds), which can come across really harshly in our listener’s ears. Chris has a much more in depth video on how his de-esser works, but for our purposes we can be content knowing that one of the best de-essers around is also free to download.
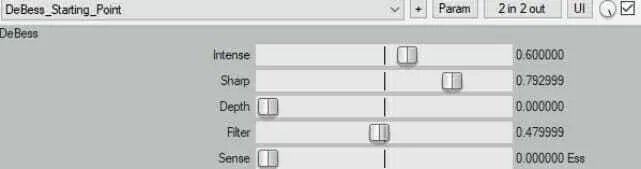
In the above picture I’ve outlined what I’ve set up as my starting point with DeBess, but for each show you’ll have to go in and tune this manually. We’ll go over each setting below and what they do:
Intensity essentially turns up the ultra-high frequencies internally when the plugin is looking for esses, so that it is more likely to find softer esses. Turning it up too high and you’ll start to hear distortion and lisping as DeBess starts to think everything is an ess sound.
Sharpness is the toughest one to describe, but it basically amounts to how selective the de-esser is in finding “ess” sounds. At the lowest setting it will allow the de-esser to activate on a lot of things that aren’t esses, whereas the highest setting will only engage the de-esser on the most sibilant of esses. Adjust this one if you’re having trouble pulling out “th” and “ffff” sounds.
Depth is how much de-essing we are applying once DeBess detects an “ess” sound. 0 is bringing that ess down the full amount that DeBess can, and 1 is applying no processing. Think of it as how much “ess” you want to let through. 0 is a good place to start, normally, and bring it up if you start hearing a “lispy” sound.
Filter controls how the esses are removed. Higher settings will only roll off the top part of the signal (similar to a split-band de-esser) whereas lower settings will bring down the whole signal equally.
Sense is almost like a wet/dry knob. At 0 you’re hearing the de-essed signal, and at 1 you’re hearing only the esses that it is pulling out. This second setting is very helpful in dialing in the settings for the de-esser. By setting it all the way over to 1, you can change the other settings until the only thing you hear coming through is “ess” sounds, and then set Sense back to 0, confident that you’re not taking out any other sounds.
There are different schools of thought of where to put a de-esser in the mixing chain, but for our purposes we’ll put it on the VO Parent track after Trileveler, so that Trileveler is not bringing up the volume of esses that DeBess just brought down. That being said, you may find it works better on some sources to have DeBess on each child track before going into the parent track, if someone is especially ess-prone.
Now that we have our tracks set up, effects in place and we’re getting a great sound, let’s save this parent track as a template. Right click anywhere on the parent track in the track panel, and click on Save tracks as track template. Name it how you want, and now anytime you need to start a new podcast
Master Track Effects
Next, we’re going to apply some effects on the Master track. If you cannot see your Master track in Reaper, go to View > Master Track, and this will make it appear in our main window alongside the rest of our tracks, and we can apply effects to it the same way. To that end, we’re going to put “JS: Master Limiter” on the parent track and leave all the default settings as is, except for setting Limit (dB) to -3.0. This is going to ensure that no matter how loud the audio out of trileveler is, it will always be brought down to under 3 dB.
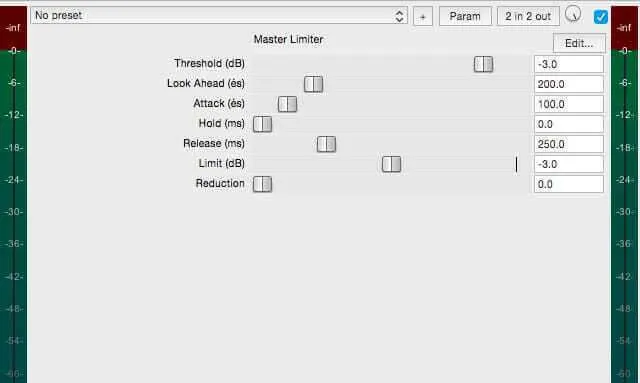
This is a “limiter”, which is essentially a compressor with an infinity-to-one ratio, meaning no matter how loud the input signal is, our limiter will bring the volume down to our threshold. We’ve set our threshold to -3 dB as that is the common peak limit on audiobooks, in case anyone here is reading this guide to produce those, but you can have it set all the way up to -0.1 dB if you’d like. Personally, I find the audio is a little smoother when you bring down transients a bit more, but as long as we’re not going over 0 dB, we’re in good shape.
Lastly on the Master track, we’re going to put on the EBUR128 Loudness Measurement effect. This won’t actually impact the sound of our audio at all, instead its purpose is to give us real time feedback on the loudness of our podcast. It does this by giving us a LUFS (Loudness Units relative to Full Scale). When you start to play your audio, you’ll see the sliders start to move around. While the documentation around LUFS is very dense and complex, for our purposes we just want to make sure that the first number (IL LUFS, or ‘integrated lufs’) is consistently at or around -16. We’ll briefly go over what each number means below, but it is by no means the final word on the topic of loudness:
Channel Config: LUFS is measured differently depending on how many channels are being considered, we’ll leave this on 2.0 Stereo.
IL LUFS is the integrated loudness of all of the audio that the meter has heard so far (up to an hour for this plugin). If you make any changes to your audio, it is good idea to hit the “RESET” button in the bottom right hand corner to clear the integrated loudness memory and have it start listening to the new adjustments fresh. As we have it in “Stereo” configuration, we’ll want the LUFS number to be at or around -16. Pop this effect out by double clicking on it in the FX menu when you render and you’ll see a much sped up version of the LUFS calculation and you can make sure there aren’t any troublesome spots in your audio.
ML LUFS is the Momentary Loudness of your audio, and you’ll see it jump around a lot more than the IL LUFS meter, because it is calculating the loudness of just the last 400 ms of audio. The ML MAX LUFS shows the highest level the ML LUFS meter recorded.
SL LUFS is the Short Term Loudness of your audio. As with the ML LUFS, you’ll see this jump around more than the IL LUFS, as it is calculating the loudness of just the last 3 seconds of audio. The SL Max LUFS shows the highest level the SL LUFS meter recorded.
TP dB is the “True Peak” of the audio. Without getting too in the weeds about what a “true peak” is, remember that the sampling rate we set is how many times per second we record the amplitude of a signal (typically 44100 or 48000), but sometimes the “true peak” of a signal may not be properly reported because it falls between two sample points, (we record sample 120 and 121, but the true peak of the audio happened at 120.5, for example). These true peaks can cause clipping if we’ve set our limiter to -0.1 or 0 dB, but because we’ve set it to -3 dB, we shouldn’t have an issue with true peaks distorting.
LRA LU is the loudness range of the audio. Essentially, it shows the difference between the average highs and lows of the signal. Think of this as your “consistency” rating. For example, a podcast could technically have an IL LUFS rating of -16 by having one person talk at 0 LUFS and another talk at -32 LUFS for equal amounts of time. While you’d technically be hitting the recommended LUFS rating, listeners would be constantly turning the volume up and down because the difference between the volume of your two speakers would be 32 loudness units! One speaker would be whisper quiet and the other would be blowing out ear drums.
The LRA LU is useful to check to make sure everyone in your show has a consistent loudness. Try to aim for an LRA LU of around 3-6. Anything below that can start to sound too compressed, and anything above that is going to be difficult for listeners who have a lot of background noise (think commuters) to hear.
Now that we have our tracks set up, effects in place and we’re getting a great sound, let’s save this parent track as a template. Right click anywhere on the parent track in the track panel, and click on Save tracks as track template. Name it how you want, and now anytime you need to start a new podcast
Finally, making sure there are only audio clips you need in every episode in our project (intro/outro music, recurring sponsor ads etc.) go to File > Project templates > Save project as template, name it, and you’re done! We now have a template customized to our podcast that we can call up instantly, record into and edit on with only minor adjustments to the FX chains that we’ve already put into place. It might seem like a lot to do all up front, and we haven’t even gotten into the actual editing of the podcast, but having a solid foundation that we can get going in 3 clicks (File > Project templates > [Name of Your Template]) saves so much of the time that goes into editing that we could be using to make really great show notes or coming up with shareable content for social media.
You might be wondering why we have so much preamble in a podcast editing guide. I’ve found the wall most podcasters hit after a few months has very little to do with actually recording the podcast itself, and everything to do with the amount of work in post needed to get each episode out. It might seem like overkill right now to set up so many FX chains and templates, but when you’ve left the editing of an episode to 10pm the night before it has to go up, I think you’ll be happy you made so many shortcuts today.
Ripple Edits
When we’re editing our podcast, we’re going to be looking to pull out 4 things:
1. Dead Air
2. Uhms and Ahs and Stutters
3. Crosstalk (Person A’s microphone picking up Person B’s voice)
4. Breathing, rustling, thuds and other noises made by people who forget they are recording a podcast and not having a “who can absentmindedly pick their microphone’s grill the longest” contest
And we’re going to do it all with just our X and Z buttons, and some generous portions of right clicking. Typically in DAWs the left click is used for selecting individual pieces of audio, and moving them about, or moving entire sections when Ripple Editing is on. It makes selecting a period of time in the DAW window very annoying because you always have to click just above or below actual bit of audio you want to select, making it a real pain if you have several tracks stacked on top of each other with audio. Instead, we’re going to use the right click, which in Reaper creates a time selection even if you’re clicking on the audio itself! So if you’re on a laptop you might want to consider plugging in a mouse for easy access to the right click function.
Anyways! Editing out dead air and filler words is very easy with our set up. Just right click and drag over the bit you want to remove, and hit X. That will automatically pull out the highlighted section and move everything after it up to where the edit started, and will automatically crossfade any sections that touch for a smooth transition. You see the crossfade if you zoom in close enough (Alt + Scrolling, or +/–), and can adjust the amount of crossfade by left-clicking on the top of the fade and dragging it to taste.
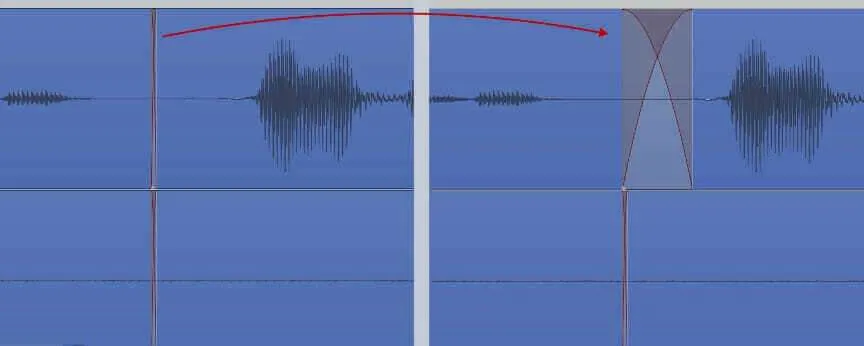
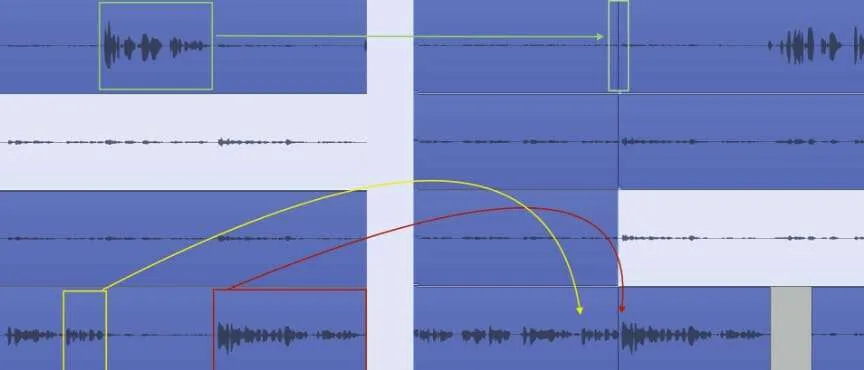
On the left we can see the default crossfade made using our custom ripple edit. By clicking and dragging the top of the crossfade, we can make it bigger in either direction. This is useful for edits mid-sentence, trying to make it as smooth as possible.
Sometimes you’ll find it’s easier and more natural sounding to edit out an “um” that transitions into a word (for instance, when someone says “Ummmmm my personal preference is…” ) if you edit out the “uh” sound in “um” and then do a longer crossfade on the second word. A word of warning: to make your speakers sound as natural as possible, try to edit out as little of the surrounding audio around a filler word as possible. If you start cutting words too close together, you quickly lose the natural flow of the speaker and the edits will sound more distracting than the “ums” and “ahs” ever did. With a little practice, you’ll find that you can pull out dead air and filler words in a way that sounds natural and keeps the pace of your show up!
Sometimes you’ll find it’s easier and more natural sounding to edit out an “um” that transitions into a word (for instance, when someone says “Ummmmm my personal preference is…” ) if you edit out the “uh” sound in “um” and then do a longer crossfade on the second word. A word of warning: to make your speakers sound as natural as possible, try to edit out as little of the surrounding audio around a filler word as possible. If you start cutting words too close together, you quickly lose the natural flow of the speaker and the edits will sound more distracting than the “ums” and “ahs” ever did. With a little practice, you’ll find that you can pull out dead air and filler words in a way that sounds natural and keeps the pace of your show up!
Crosstalk Edits
Next, we have to deal with the crosstalk that is building up on our tracks. If you have a podcast and haven’t been gating or scrubbing your tracks to get rid of crosstalk, this is the single biggest improvement you can make. Basically, anytime someone isn’t speaking, you want make sure their track is muted some way. Without doing this, speakers can start to sound distant and the noise floor (the amount of noise on a track when no one is talking) can become distractingly high. We should be dealing with the majority of cross-talk and room tone with our Automix plugin, but you’ll often have a little bit of audio that passes through regardless, and we’ll deal with those instances now.
A lot of people will suggest setting up gates, and we do have one on Trileveler, but we don’t want to depend on this to keep out the crosstalk and keep in the good stuff, because oftentimes podcasts are recorded in less than ideal places, and in some cases the crosstalk might be louder than the speaker. You’ll run into this lots if you try recording someone loud and boisterous with someone quieter and more reserved in the same room, the loud person will oftentimes be louder on the quieter person’s track than the quiet person is!
So, to deal with this, we’re going to pull out any audio we don’t need with our trusty Z button. Highlight the audio you want to delete with a right click/drag (if doing it over multiple tracks, make sure you drag the box over all the audio you want deleted) and press Z. It’s very simple, but can be time consuming to do, as the more people you have in an episode, the more audio you have to delete. The two best ways to do this, I’ve found, is to either pull out all the crosstalk before you start making cuts, so you just get it out of the way, or do what I call rolling edits, where you select audio and delete it while the audio is playing, and then press F to centre Reaper on the currently playing audio again. This last way is a little more advanced, but it saves you from going through the episode twice!
Bringing Down Breaths
Finally, let’s talk about breaths. After editing hundreds of podcasts, I can say without a shadow of a doubt that every person’s breathing patterns are as unique as a fingerprint, and they are all annoying. Now, you may not share this opinion, and find the laboured wheezing of a particularly annoying braggart a comical juxtaposition that would be of benefit to your podcast, but by and large we’ll want to edit out the sharp intakes of air people take while they’re in the middle of making a point. These can be particularly sibilant and can be fatiguing on listeners’ ears. However, if we ripple edit out the entirety of every breath our guest takes, they start to sound very unnatural and almost robotic, while simply deleting the breaths can leave long, awkward gaps.
Instead, try splitting the difference. Delete the entirety of the breath, and then ripple edit out half of the resulting silence. I have found that nearly every time I employ this trick, the result sounds more natural than either edit on their own.
Instead, try splitting the difference. Delete the entirety of the breath, and then ripple edit out half of the resulting silence. I have found that nearly every time I employ this trick, the result sounds more natural than either edit on their own.
Layering Music
The main part of our podcast editing is done. However, if yours is like most podcasts, you have separately recorded intro, outro, music cues and maybe an ad to insert into your podcast once you’re done editing the main part. This is where ripple editing proper becomes very effective. Under Options select Ripple Editing Off to change it to Ripple Editing Per Track and then once more to Ripple Editing All Tracks. With this enabled, left clicking and dragging any clip will move the highlighted clip and every clip on every track after it at the same rate, allowing you to quickly make room for the intro and ads in the podcast.
Be wary though: never move tracks too quickly with ripple editing enabled, as you can sometimes move clips to different tracks and mess up the sync of the podcast. Always be ready with Cmd + Z to undo any mishaps.
If you’re putting music underneath your voice, take an EQ and dip out some frequencies around the fundamental (80-120 Hz) and a broad swath in the high end (around 2-8kHz) to make your voice really pop out and not get lost in the music.
For most music bought from royalty-free music sites, bringing down the volume 8-12 decibels and then doing the EQ tuck gives best results.
Render Settings
When you’re happy with your podcast, go to File > Render and you’ll be greeted with a pop up window. Here are the settings to use if your podcast is fairly talk oriented, with the occasional music cue:
Source: Master Mix
Bounds: Entire Project
Choose your output directory
File Name: $project
“$project” gives your rendered track the same name as the project, which is a handy time saver
Sample Rate: 44100 Hz
Channels: Mono
Full-speed Offline
Use Project Sample Rate For Mixing and FX/Synth Processing
Resample Mode (if needed): Fast
Tracks with only mono media to mono files
Output format: MP3
Mode: Constant Bitrate (CBR)
Bitrate: 96 kbps
It should be noted that for rendering there is no final word on the best way to do things. However, this guide is making sure you conform to the most commonly accepted guidelines for podcasts. For instance, you may see that -16 LUFS (Loudness Units relative to Full Scale, a way of measuring loudness) is recommended for podcasts, but we’ve set our individual tracks to -19 LUFS. However, because of panning laws, our mono file will gain 3dB of volume when going from stereo-to-mono so in the end we will be at -16 LUFS.
And that’s everything! From here you should have a great basis to start creating your show and streamlining your editing process to become quicker and edit better.