The Complete Guide To Podcast Recording
Riley Byrne
- March 1, 2021
- 13 min read
Hey guys and welcome to our third official guide! Arguably we should have done this one first, but covering every way to record on both Mac and PC is no small feat. There are a lot of different aspects to recording that we need to cover, from general principles of how microphones work all the way to routing audio for guests in studio and over Skype simultaneously.
Like our other guides, this one aims to give you a fundamental understanding of what it is we’re doing, so you can apply these concepts to customize a workflow that works for you. As always, our tools are free, outside of Reaper and even that isn’t necessarily essential for this guide, it will just be used in the examples
Microphone Placement and Recording Techniques
There’s a saying amongst audio engineers that ‘garbage in equals garbage out’. Basically, no matter what you do when you’re mixing and mastering, if your initial recording was subpar, the final recording will reflect that. Like most axioms, there is a certain amount of hyperbole, but it does illustrate just how important getting your setup right when you start recording will be to your finished podcast. Making sure you’re recording as effectively as possible not only gives your listener a better sounding product, but it can also save you massive amounts of time in the editing bay trying to iron out mistakes. So let’s start with the basics.
Right now you’re probably sitting in the room where you will record your podcast. Close your eyes and take a minute to listen to your room. Seriously. Close your eyes for 60 seconds and listen to the whir of your laptop, the overhead fans, maybe the AC in the other room. Perhaps there’s an open window and maybe you can hear the sound of traffic, or the whirring of a million tiny bugs. There’s probably some construction going on around you if you live in the city, or animals fornicating if you live in the country. Anything you can hear, your microphone will be able to hear as well, and these noises will impact the final sound of your podcast, so do your best to mitigate those. Close windows, turn off ACs, make sure your computer has adequate airflow and isn’t running anything intensive while you’re recording.
What we’re trying to do is identify and eliminate any sources of consistent noise. Each one we can reduce will have an effect on our noise floor, or the sound your mic picks up when no one is talking. This is especially important for podcasts with more than one person, as multiple mics in the same room will all pick up the same noise, and compound it in the final mix. Having our noise floor be as low as possible from the outset means less noise reduction processing and gives our listeners a cleaner sounding podcast.
Next, snap your fingers or clap your hands and listen to the echos in the room. Sound loves to bounce off hard surfaces, and big spaces gives it even more room to do so. For example, think of what it sounds like to clap in an empty gymnasium. These echoes, as slight as they may be, are called reflections, and they can go a long way to degrading the sound of your voice in a podcast. This is because the microphone will pick up your voice speaking into it, and then immediately after the reflection of your voice bouncing off walls, and then the reflection of the reflection (and on and on…) and will make your voice sound distant and echo-y. Unlike noise, which careful processing can all but eliminate, getting reflections out of a recording is almost impossible to do to a satisfactory level.
To mitigate reflections, it is always best to record in as small and soft a room as possible. By “soft”, I mean a room with things like couches, beds, pillows, curtains, carpets, clothes, oversized teddy bears or anything else that absorbs sound instead of reflects it. That’s why they tell you to scream into a pillow and not at a wall. Being in a room with lots of soft objects absorbs reflections and makes your voice sound more direct and clean to the microphone. This is why a lot of voice actors who record at home do so in their closets. It’s a small space with lots of dense, soft material to soak up reflections. If you’re recording in the same space week after week, it might be worth it to look into buying some sound dampening foam, but hanging a heavy blanket on a wall can work wonders as well.
Once we’ve set up our room to be as dampening as possible, let’s talk about microphone placement. If you google “[microphone name] + polar pattern” you’ll see a picture that illustrating how well the microphone picks up sound around it. The most common polar pattern is called Cardioid, which essentially picks up audio from directly in front of it, and rejects audio relatively well from the sides, and very well from behind it.
When placing our microphones, we want to use that sound rejection to our advantage, by making sure the backs of our microphones are facing the noisiest elements in our room. If you have two people recording, make sure the microphones are facing away from each other to minimize the amount of crosstalk (person A’s voice being picked up on person B’s track). If you’re recording 4 people, arrange the mics in an X pattern facing outwards, to maximize noise rejection.
Some microphones, like the Yeti, will have options for multiple polar patterns. If you’re using it to record only one person, always use the Cardioid pattern (it looks like a heart) to maximize noise reduction. To record two people, use bidirectional (two circles), and situate yourselves directly in front and behind the microphone.
Finally, let’s talk about how to situate yourself in relation to the microphone. The accepted wisdom is to have the distance equivalent to your thumb and pinky outstretched between your mouth and the mic. However, while this is for ideal studio situations, you may find that speaking closer to the mic gives you a better signal to noise ratio. Essentially, the level of static noise your microphone picks up will be consistent no matter how loud or quiet your voice is, so the closer you speak into the microphone, the louder your voice will be without having to shout, and then when you mix your audio you can lower the volume of your track so that your voice is at a regular tone, but the noise is significantly reduced. Conversely, if you speak too far away from the mic, your voice will be quieter and you’ll have to bring up the volume of the track, raising the noise floor with it.
Be wary though, the closer you speak to the mic, the more likely you are to create plosives (which we deal with in our guide to cleaning up audio) and sibilance (which we tackle in our guide to editing). Always make sure you have a wind screen or pop filter between you in the mic, and if you’re really in a bind, taping a pencil to the front grill of a microphone can mitigate some of the problems by redirecting air away from directly into the capsule.
In general, I encourage those new to podcasting and guests on podcasts to talk closer to the microphone than they normally would, not only for a better signal-to-noise ratio, but also because it takes a while to get used to talking into a microphone, and oftentimes people just get caught up in the moment and forget to direct their audio into the mic, instead directing it towards the person they’re talking to. Speaking extra close to the mic will cause a disproportionate amount of bass tones to be picked up (known as the “proximity effect”), but we show you how to deal with that in our Complete Guide to Podcast Editing.
USB Microphone
Now that we have our room setup for recording, and we’ve got some good mic techniques under our belt, let’s look at the different ways to get our voice into our computer so we can start assembling our podcast. The newest, and least complicated, way of doing this is with USB microphones. These are microphones that plug directly into your computer, and need no additional hardware to get started recording. Oftentimes they need no additional software either, as most USB microphones are “plug and play” these days.
This is the biggest advantage of USB microphones over their XLR counterparts: a single (relatively inexpensive) purchase can get you up and recording immediately. This is most likely the route you want to go if you are a solo podcaster, conducting interviews remotely, and/or recording at a computer and don’t anticipate these circumstances to change in the near future.
However, a USB microphone is less appropriate for podcasts with multiple people recording in the same room. It can be done, and we’ll show a way to do it with aggregate devices later on, but it introduces a slew of new points of failure that can be headache to sort out. Sometimes two of the same USB mic will only appear as one to the computer, and you can start to get “drift” in the recordings, where the clocks in each USB are slightly misaligned causing your audio to drift out of sync. This is not to say that USB microphones are not a great option for podcasters, just that some precautions should be taken depending on your setup.
XLR Microphone
XLR connectors are the most common type amongst microphones, and have been around since the 1950s. Their wiring insulates the audio signal from electrical interference, but does require an analog-to-digital (A/D) converter to make the signal from the microphone into something your computer can recognize. So in addition to buying an XLR microphone, you’ll also need to purchase an audio interface or a mobile recording device. These will take one, or often several, XLR inputs and convert them into tracks that your Digital Audio Workstation (DAW) will be able to record individually, giving you more control when you edit your podcast.
While the need for additional equipment may seem burdensome, there are many benefits to recording with an audio interface, especially for podcasters who anticipate their needs changing as their podcast grows. Chief among these reasons is adaptability. An interface with 4 XLR inputs will serve the needs of ~90% of podcasters for the entirety of their career. How often do you listen to a podcast with more than 4 people speaking live in the same studio? Any more than that and things start to get a little too busy to keep track of, with the exception of maybe Dungeons and Dragons podcasts.
But adaptability also means that you’ll also be able to mix and match mics, and not have to worry if the computer will recognize them. For instance, it’s not uncommon while I’m recording on the road to mix 2 dynamic and 2 condenser mics for a 4 person podcast, and carefully balancing them with the preamps to get consistent levels across all the mics. It’s a little more money upfront but it makes your recording situation much more flexible.
It’s beyond the scope of this article to get into what mics are best for podcast recording, but our friends over at Podcast Insights have a great write-up on the best USB and XLR microphones out there.
Recording into your DAW
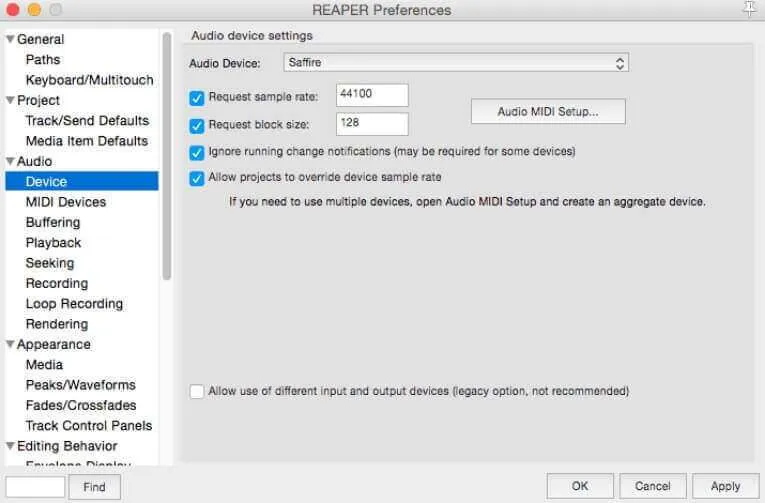
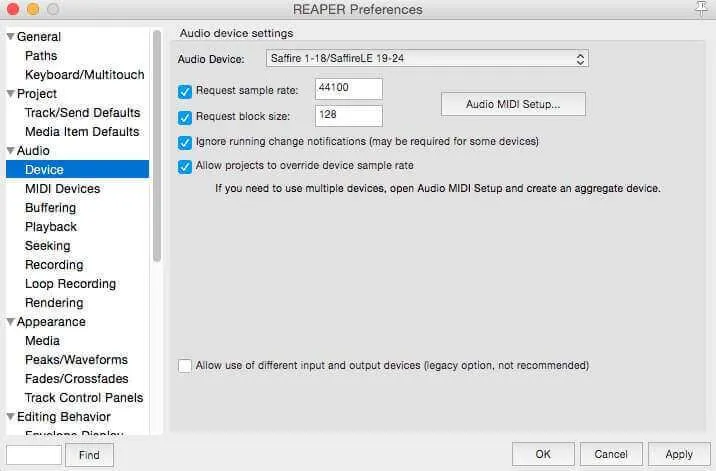
This is where the fun and frustration starts in equal measure. First, we want to restart our computer with all of our recording devices plugged in. This isn’t strictly necessary, but it is the first step in troubleshooting any connectivity issues between our mics and computer, so always good to start off on the right foot. From here, we want to open up our DAW (in this case Reaper), and make sure its input is set to what we’ll be using to record. Under Preferences > Audio > Device make sure that Audio Device is set to your microphone, which will never be “built-in input”. It will usually have a manufacturer or brand name listed. Next, make sure Request Sample Rate is set to 44100.
Now we have a few options for Request Block Size. This is your computer’s buffer for the incoming audio. As per our requested sample rate, our computer is dividing up what you speak into the microphone into 44100 samples every second, and our block size is how often it will check for new audio. Smaller block sizes means the computer checks more often, which reduces latency (the delay between speaking into the mic and hearing it back) but can be more taxing, whereas larger sizes increase latency but are easier on your hardware. Generally, if you are trying to record with someone over VOIP, try to use 128 or 256 samples as options. Any lower than 128 tends to be very taxing for systems, especially older ones. The rule of thumb for VOIP conversations is that you want to keep latency under 150ms, and a setting of 128 shouldn’t add more than 15ms to total time. However, if you’re recording solo, or with everyone in the same room, try using a setting of 512 of 1024, to lessen the strain on the computer and ensure no audio hiccups.
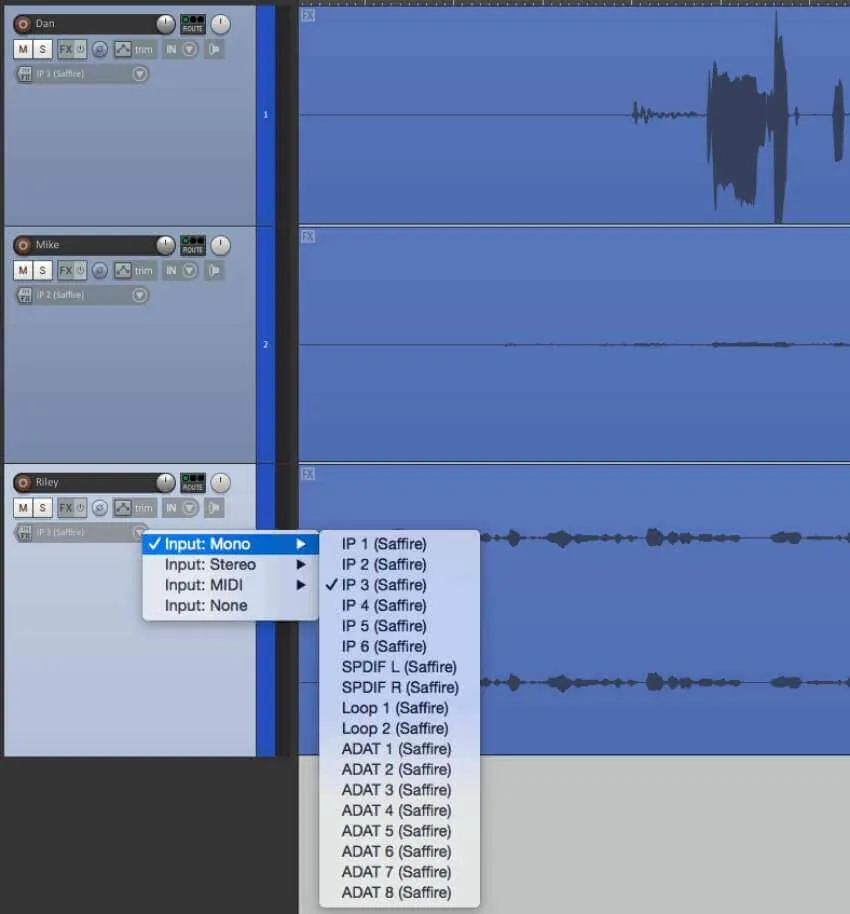
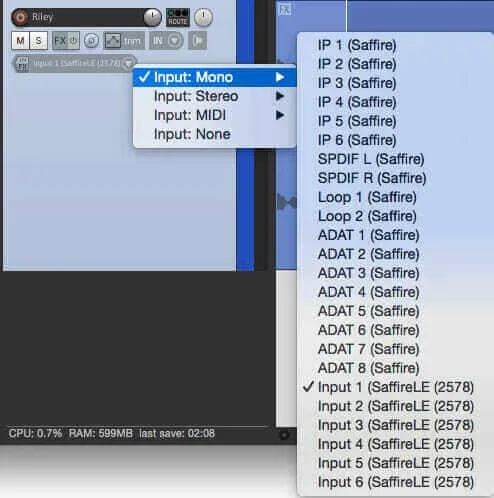
With our audio device sorted, we’ll want to create some tracks. In the main window, let’s press Cmd + T (Ctrl + T on Windows) to create some tracks, and click on the grey IP box under our M, S and FX (mute, solo and effects, respectively) buttons. This should open up a list of inputs to choose from. If you’re using an audio interface, you’ll want to ensure that you’re choosing mono inputs, whereas some USB mics (like the Yeti) actually record in stereo, so you’ll want to choose the corresponding stereo pair (usually 1/2). It’s also a good idea to name your tracks so you can easily identify them when problems arise.
With our audio device sorted, we’ll want to create some tracks. In the main window, let’s press Cmd + T (Ctrl + T on Windows) to create some tracks, and click on the grey IP box under our M, S and FX (mute, solo and effects, respectively) buttons. This should open up a list of inputs to choose from. If you’re using an audio interface, you’ll want to ensure that you’re choosing mono inputs, whereas some USB mics (like the Yeti) actually record in stereo, so you’ll want to choose the corresponding stereo pair (usually 1/2). It’s also a good idea to name your tracks so you can easily identify them when problems arise.
Now let’s start testing the levels of our tracks. Let’s click the red Arm circles next to the name of our tracks, and also the M button to mute their outputs. Speak into the microphone and you should be able to see the levels respond in Reaper with a yellow bar. Test speaking into it the way you expect to in the podcast, and then give a good hearty laugh into it as well. Remember to turn on Phantom Power if you’re using a condenser microphone, and don’t worry about using a dynamic microphone in a port that has phantom power on, it won’t have an effect.
You’ll want to make sure the level is around ¾ full when you’re speaking, and that the bar’s top doesn’t become red when you’re laughing. The red at the top of the bar indicates that the signal has “clipped”, or we’ve pushed the microphone past the maximum amount of volume it can record, and the audio will distort during playback.
You’ll want to make sure the level is around ¾ full when you’re speaking, and that the bar’s top doesn’t become red when you’re laughing. The red at the top of the bar indicates that the signal has “clipped”, or we’ve pushed the microphone past the maximum amount of volume it can record, and the audio will distort during playback.
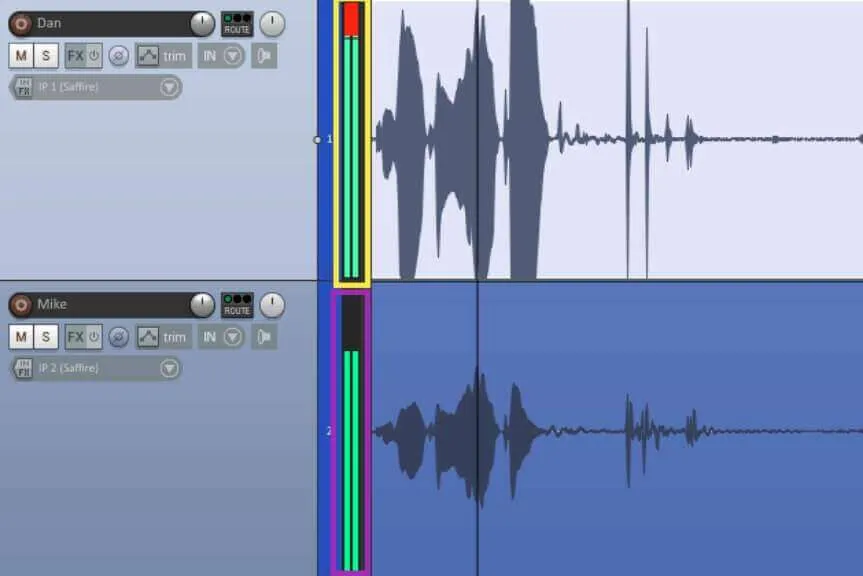
Here in the yellow box you can see the red indicator at the top signifying Dan’s track has clipped, and in the waveform beside it, you can see that the top and bottoms are cut off. Conversely, Mike’s audio in the purple box is right around the 3/4 full mark, which is where we want to be.
To prevent clipping, we’ll adjust the preamps of the microphones until the incoming signal is at a healthy volume, but isn’t clipping when we push it. On an audio interface or USB microphones with a gain knob, this is quite simple and just requires adjustment of the knobs on the front of the unit. Be wary though, many preamps will start to introduce extra noise into the signal when set too high. A good rule of thumb is to never push a gain knob past ¾ of the way full to keep the signal clean.
For USB mics with no dedicated gain knobs, you’ll have to go into System Preferences > Sound > Input (Mac) or Control Panel > Sound > Recording > Microphone Properties (Windows) and set your input gain that way. Again, try to keep all inputs at roughly the same level and don’t let any clip!
This finishes up all the basic recording techniques that you’ll need to know. You should have no problem recording solo, with a group in the same room, or remotely with guests. The rest of this guide focuses on situations that you may never actually experience. From here you can go forth and record your podcasts, but if you’re looking for advice on advanced routing, read on.
Aggregate Devices and ASIO4ALL
Let’s say you start off with a Scarlett 2i2 for you and your cohost and after 20 episodes you think that you’d like to add a third person to the podcast, but you only have 2 XLR ports. You’re stuck wondering how to incorporate a new person without breaking the bank upgrading to a 4 XLR Focusrite, but also don’t want to compromise quality by selling your 2i2 and going with a Behringer interface. This is where Aggregate Devices (Mac) and ASIO4ALL (Windows) come in handy. These are free tools that allow you to group together multiple audio interfaces and USB mics into a single aggregate interface that your DAW can recognize and receive information from. In our example above, it would allow the group to add a third USB microphone to their setup without having to change interfaces. Let’s break down how to do this.
For the following examples, we’re going to create an aggregated interface by combining two interfaces I happen to have on hand at the moment, a Saffire Pro 26 and a SaffireLE. Starting on Mac, lets search for Audio MIDI Setup in Spotlight, and press Cmd + 1 to bring up the Audio Devices menu. On the left hand side we can see a list of all of our audio devices that the computer is aware of. In the bottom left hand corner we want to click on + > Create Aggregate Device.
For the following examples, we’re going to create an aggregated interface by combining two interfaces I happen to have on hand at the moment, a Saffire Pro 26 and a SaffireLE. Starting on Mac, lets search for Audio MIDI Setup in Spotlight, and press Cmd + 1 to bring up the Audio Devices menu. On the left hand side we can see a list of all of our audio devices that the computer is aware of. In the bottom left hand corner we want to click on + > Create Aggregate Device.
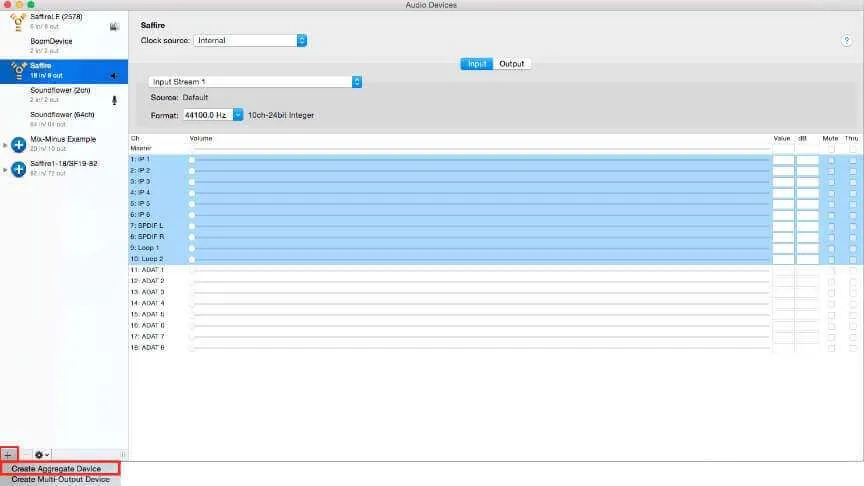
A new device called “Aggregate Device” will be created with ‘0 in/ 0 out’ listed underneath it. In the main window, you should see a breakdown of all your audio devices with checkboxes next to them. Click the checkbox next to the device with the most inputs that you intend to use (in this case ‘Saffire’) to make it the first part of the aggregate device
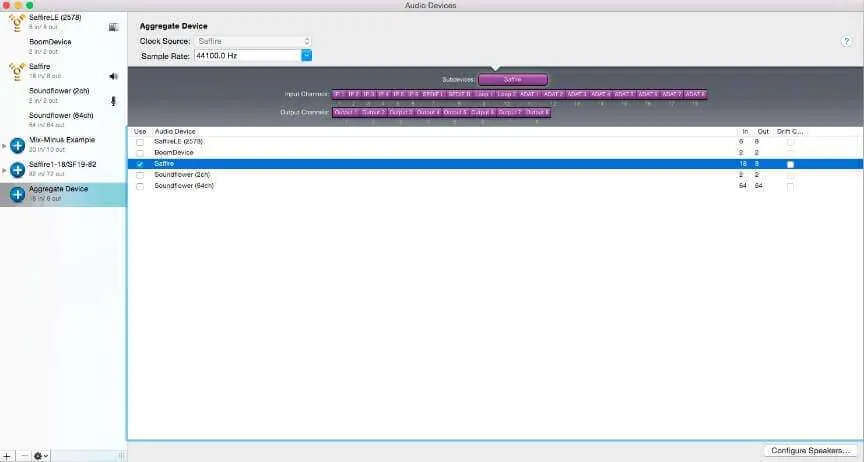
The window should update with a breakdown of inputs and outputs of the first device. Click the next device you want to include (in this case the SaffireLE) to add it.
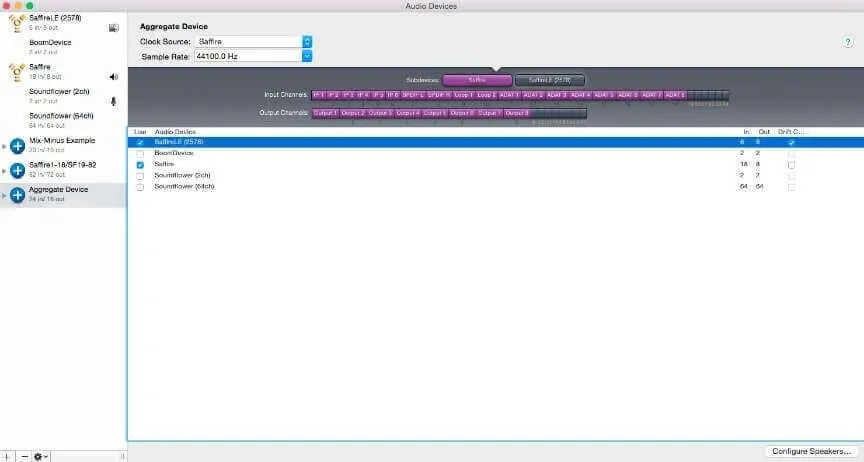
Now we can see that the SaffireLE’s inputs and outputs have been added to our aggregate device, and on the side our “Aggregate Device” is now a 24 in /16 out interface. For recording purposes, we want to take special note of where our secondary device’s inputs start in the aggregate device. For instance, SaffireLE’s first input comes after the Saffire’s 18th input, so in the aggregate device the first SaffireLE input will actually be input 19.
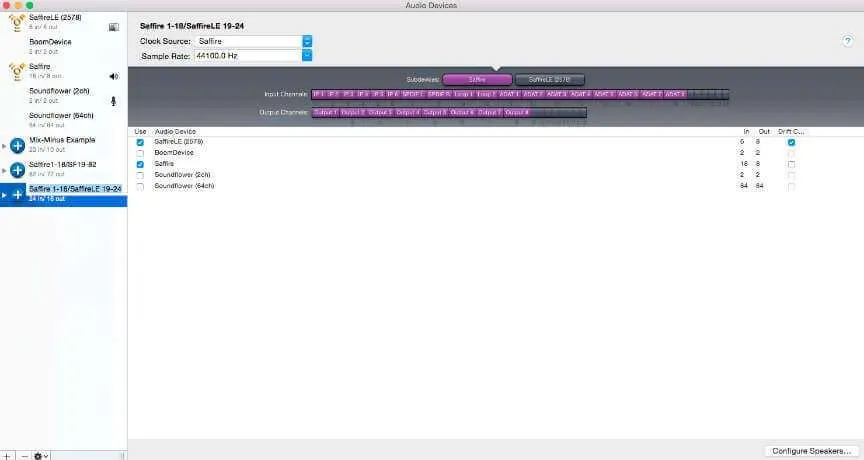
Let’s rename our device to reflect what it is, and where the inputs are coming from. “Saffire1-18/SaffireLE19-24” tells me that the first 18 inputs are the Saffire, and that 19-24 are the 1-6 of the SaffireLE. I know it’s a lot to digest, but stick with me!
Let’s rename our device to reflect what it is, and where the inputs are coming from. “Saffire1-18/SaffireLE19-24” tells me that the first 18 inputs are the Saffire, and that 19-24 are the 1-6 of the SaffireLE. I know it’s a lot to digest, but stick with me!
Now, back in Reaper, let’s set our input to our new aggregate device.
I’ll plug microphones into the first inputs of both my Saffire and SaffireLE, and Reaper will organize our inputs based on our aggregate device.
I’ve done this for a while when podcasting on the road, and I’ve never had an issue. For the guide I tested this method 5 different times across different DAWs for 90 minutes at a time, and had no issues whatsoever.
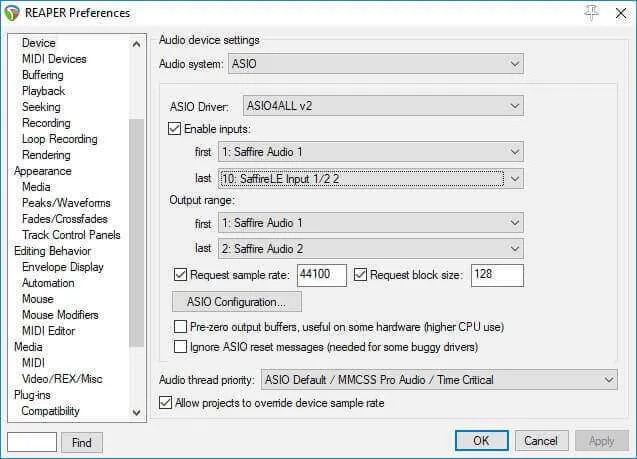
ASIO4ALL is similar to aggregating devices, but instead of making dedicated virtual devices, you are essentially rerouting audio as you need to. It’s Windows only and needs to first be downloaded and installed from here. After you’ve installed and restarted, open up Reaper and go to Options > Preferences > Audio > Device and change the Audio System to ASIO. You should see the menu update and you’ll want to change ASIO Driver to ASIO4ALL v2. Click on ASIO Configuration, which should open a new window.
ASIO4ALL is similar to aggregating devices, but instead of making dedicated virtual devices, you are essentially rerouting audio as you need to. It’s Windows only and needs to first be downloaded and installed from here. After you’ve installed and restarted, open up Reaper and go to Options > Preferences > Audio > Device and change the Audio System to ASIO. You should see the menu update and you’ll want to change ASIO Driver to ASIO4ALL v2. Click on ASIO Configuration, which should open a new window.
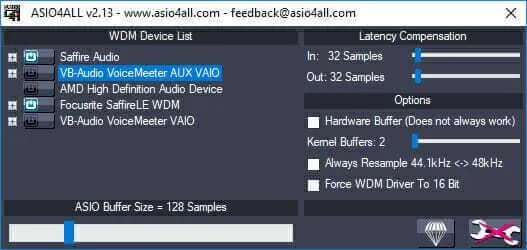
This is the ASIO4ALL setup window, and it’s from here that we’ll route the audio we want into our DAW. Firstly, click on the wrench to open the advanced options. From here, click the power symbol next to the inputs and outputs you want to use. You can even use the + sign next to some inputs and only use certain inputs from them, but Reaper labels all of our inputs so there is not as much risk for confusion. As you can see here, we have Saffire Audio and Focusrite SaffireLE WDM active. Once you’ve set up your inputs, close the ASIO4ALL window and click Okay in the Reaper preferences menu to let it update. Open up Preferences again and make sure the First input is the topmost option and the Last is the bottommost. This will give you access to all the inputs we selected in the ASIO4ALL screen.
From here, just create a few tracks, and in the input dropdown menu you should now see the option to route all of the inputs you selected. Again, for this guide I tested this method 5 times with different inputs for 90 minutes apiece and had no issues.
Recording Remote and In Studio Guest (AKA Mix Minus)
Let’s say you wanted to record 3 hosts in studio and one guest who was joining via Skype (although Discord offers better sound for this sort of thing) and you want to record all 4 tracks, while having a mix of your three voices sent to the remote guest, and a mix of just the remote guest’s audio for the three in studio hosts. This is the reason this guide took me 2 weeks to research, as the platonic ideal of virtual mix-minus routing is something so specific to podcasters that almost nothing is written about it, save for people suggesting getting an external mixer. But! There is a better way, my friends.
For Macs, let’s start by downloading Soundflower and SoundflowerBed. These are two programs with a somewhat legendary status amongst audio producers because of the immense amount of power they give your audio routing for free. Also because they are frequently abandoned and then reclaimed by developers who have patched it continuously over the last 5 years.
Soundflower allows you to send audio between just about any program on your computer, although it has no physical outputs itself. That’s where SoundflowerBed comes in, which allows you to “tap into” Soundflower’s stream and direct it to a physical output. We’ll use these two abilities to make a very simple mix minus for when we’re talking to remote guests.
Our first step is to create a new aggregate device that will combine all of our physical inputs as well as our virtual one for Skype audio. Open up our Audio MIDI Setup > Cmd + 1 to open the audio routing, + in the bottom lefthand corner to make a new aggregate device and then make sure your hardware inputs and Soundflower (2ch) are selected.

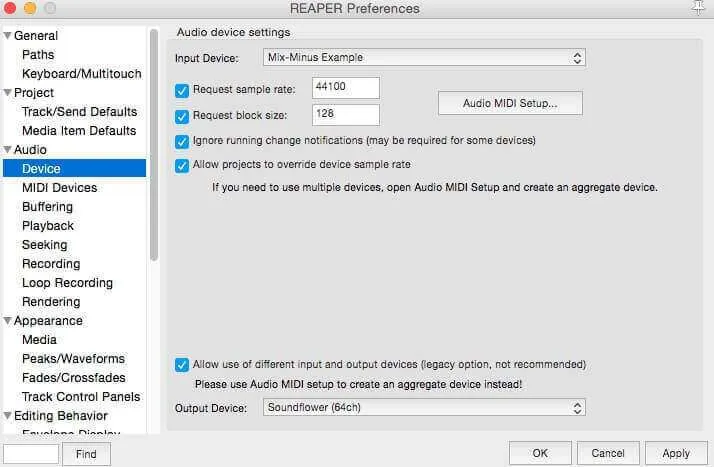
Next, open up Reaper and from Preferences > Audio > Device make sure our newly created aggregate device is selected as the input, and down at the bottom select Allow use of different input and output devices (legacy option, not recommended). For the new audio output, select Soundflower (64ch).
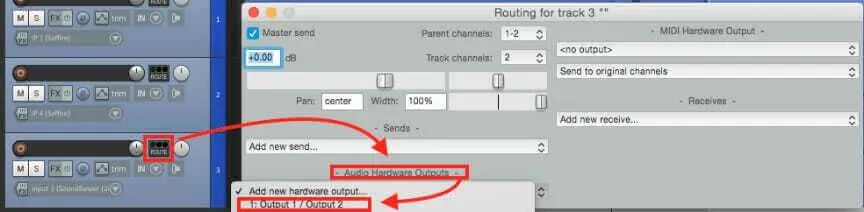
Now all that is left to do is route our audio out from Reaper into Skype. Create tracks in Reaper, using a stereo track to capture 1/2 Soundflower (2c) (our Skype track) and as many hardware inputs as you need. For each hardware input you plan to use, click on its Route button > Add new hardware output > 1: Output 1 / Output 2. This will simultaneously record all of audio, and send a mix of all the in-studio mics to the Skype guest.
Finally, open up Skype and under Preferences > Audio/Video change the Microphone to Soundflower (64) and Ringing and Speakers to Soundflower (2ch). That’s it! We now have a mix minus, with the audio of our remote guest being recorded to a separate track. Pretty simple! Be very thankful you don’t have to go through the hoops our Windows brethren are about to suffer.
On Windows, we first need to download and install Voicemeeter Banana. This is a powerful (and free! Although you should donate to them if you’re getting a lot of use out of it) tool that lets us route physical and virtual audio into two virtual busses, one that we’ll send to Skype and one that we’ll send to our DAW.
So to start setting things up, open Voicemeeter Banana and under Hardware Input 1 choose your audio interface/USB mic. If you’re chaining together several inputs, select them in Hardware Input 2 and 3. Note: if you’re using an interface with more than 2 inputs, Banana will automatically route the extra channels into Hardware Inputs 2 & 3.
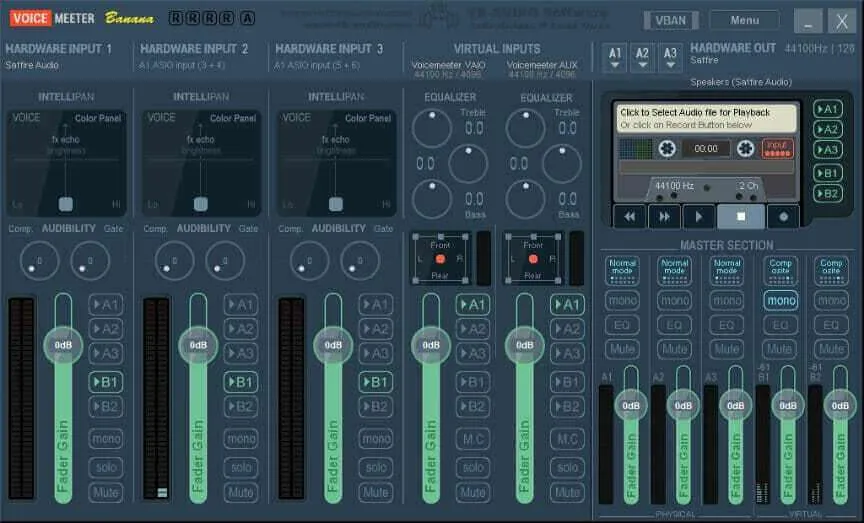
Next, we’re going to start making our mic mix just for the Skype call. Skype is finicky in that it will only incorporate the first 2 inputs it senses coming into it, so if you route a 4 input audio interface to it, only mic one and two will be heard. Instead, we’re going to send all of our mics to a stereo mix buss that will relay our audio to Skype in a format it likes. To do this, select B1 underneath all the hardware inputs you want to use, and make sure all others (A1-3, B2) are deselected.
Now, under Virtual Inputs, we want to make sure that A1 is selected for both Voicemeeter VAIO and Voicemeeter AUX. It’s a weird system, but if you remember that A = hardware and B = virtual, it gets a little easier. Basically, we’re ensuring that any audio coming out of Skype will automatically come through our interface so our hosts in the studio can hear it, and to do that we’re making sure it’s always routed directly through to the first two outputs.
At this point, you’ll want to change the output of your computer audio to Voicemeeter AUX, by clicking on the speaker in the right hand corner of the toolbar and selecting it from the menu.
Back in Voicemeeter Banana, under the Master Section, you’ll see that the last two bars are labelled Virtual, meaning that these are our B1 and B2 outputs. Click on the button labelled Normal Mode until it says Composite for both, and click Mono. This splits our virtual buss into 8 separate tracks, that we can record separately. 1-2 are our stereo buss that carries any signal directly routed to it by using the B buttons on our inputs, 3-6 are the first 4 inputs of our hardware, and 7-8 are our computer audio’s stereo output. I very much admire and appreciate Voicemeeter Banana being put out as a free tool, but man oh man is this layout tough to get your head around.
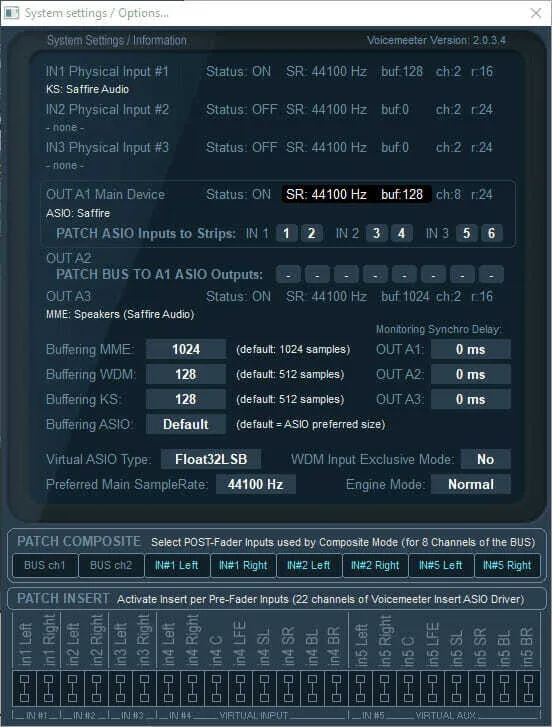
After this, click on Menu, and just make sure Buffering WDM, Buffering KS and Buffering ASIO are set to 128 or 256, to cut down on latency. You’ll get a warning box that this is for advanced users only, just dismiss it. Note: if you’re experiencing audio hiccups/dropouts while recording, change these settings back to default. Under Patch Composite, make sure the first two boxes are BUS ch1 & 2. We want to set the next 4 to look at our hardware inputs. This part is also a little confusing, but stick with me. In my example, the first two inputs from my Saffire are routed to VoiceMeeter Banana Hardware Input 1, as a stereo pair. But the Patch Composite menu looks at the internal routing of Banana, so we want the 3rd and 4th inputs to be the very top IN#1 Left and Right, essentially routing the Banana’s Hardware Input 1’s stereo pair into two mono tracks. Similarly, we want to route Patch Composite outputs 5 & 6 to the topmost IN#2 Left & Right. Finally, we want to route Patch Composite outputs 7 & 8 to IN#5 Left & Right. I wouldn’t blame you for being extraordinarily confused at the moment. It took me several days to figure out all of the kinks in this system, but luckily you only have to do this once, as you can go to Menu > Save Settings to make sure you never have to go through this process again.
From here on out, the process is fairly simple. Open up Skype and change the Microphone to VoiceMeeter Output (VB-Audio VoiceMeeter VAIO) and Speakers to VoiceMeeter Output (VB-Audio VoiceMeeter AUX). Now we have our hardware inputs going through outputs 1/2 of our B1 mixbus and directly into Skype, and sending our remote guest’s audio through outputs 7/8 of our B2 mixbus.
From here on out, the process is fairly simple. Open up Skype and change the Microphone to VoiceMeeter Output (VB-Audio VoiceMeeter VAIO) and Speakers to VoiceMeeter Output (VB-Audio VoiceMeeter AUX). Now we have our hardware inputs going through outputs 1/2 of our B1 mixbus and directly into Skype, and sending our remote guest’s audio through outputs 7/8 of our B2 mixbus.
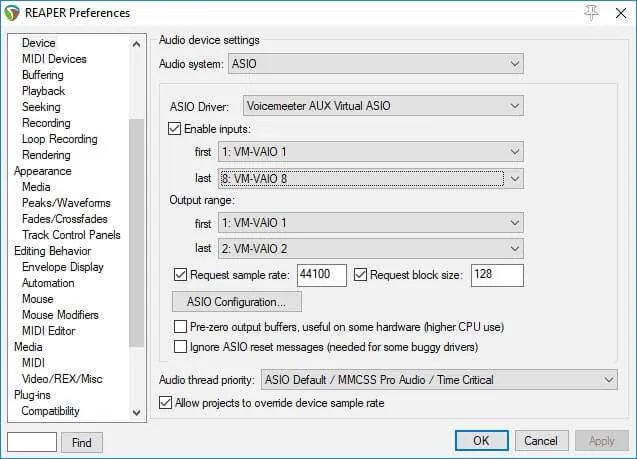
The very last step here is to set up Reaper to record all of these tracks at once. Under Preferences > Audio > Device > Audio System choose ASIO. Next, ensure ASIO Driver is set to Voicemeeter AUX Virtual ASIO, and the first/last inputs are set to 1: VM-VAIO 1 / 8: VM-VAIO 8. Ensure the Request Sample Rate is 44100 and Request Block Size is either 128 or 256, depending on how fast your system is.
There you have it! We’ve set up a mix-minus of sorts. Once again, I tested out this system multiple times for 90 minute periods and had no issues. If you do experience audio hiccups, try setting the Request Block Size to a higher amount (256 or 512), but remember it will mean more delay between you and your Skype guest.
As always, I hope you’ve found this guide as useful! Normally in the course of writing these guides I’ll be cruising along thinking “why has no one done this yet?” and then I’ll find out the reason 4000 words into the guide. In this case, figuring out exactly how Voicemeeter Banana worked took about half of my time. If you know of any Windows programs that offers similar mix-minus potential, please pass it along to me at rileybyrne@podigy.co, and I’ll see if it’s any easier to set up than VoiceMeeter.
And of course, once you’re done recording your audio, you’ll want to clean it up, and then edit it down to get it sounding real pretty, so you should check out our other guides.